Quick Sew Trivets

DIY Projects -> sewing -> kitchen
Hot Pad Or Trivet
These are easy to sew. Use scraps of fabric and quilt batting or insul-bright insulation.
Disclosure: This site contains affiliate links. As an Amazon Associate, I earn from qualifying purchases. Clicking on links, and purchasing products, may result in the seller paying us compensation - at no extra cost to you. Affiliate links are in green.
Also see:
Lifestyle Blog
Easy Sewing Patterns
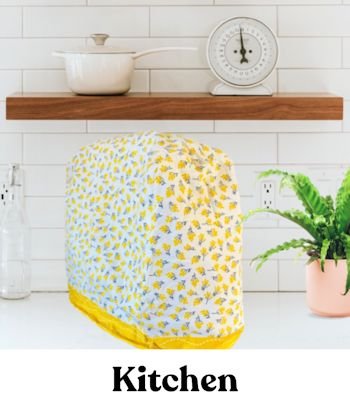
Kitchen Patterns
Woven Crochet Trivet
Trivet vs Hot Pad
Our instructions create a nice table trivet. A trivet is used on any type of surface that needs to be protected from heat - such as a wood table.
A hot pad is made in a similar way, but cotton batting is also used (to further protect hands), and the insul-bright is placed on the lining side to reflect heat back toward the hot baking dish, rather than on the decorative fabric side. The decorative fabric is on the "back side", and the lining and insul-bright are on the side that touches the hot dish.
Remember that the shiny side of the insulation should face the heat source. For a casserole dish carrying case, the shiny side would be on the lining side of the carrier, facing the dish - just as it is for a hot pad. For a trivet, it is under the outer fabric, facing the top, where the dish will sit.
These instructions can be used to create hot pads or trivets. Just remember which side of your finished piece will be against the hot surface, and layer the insulation and fabric accordingly.
A word about insulation:
Insul-bright insulation by the Warm Company directs the heat back up toward the hot object, away from the decorative fabric layer. The hot dish comes into contact with the decorative fabric side. The reflective coating is placed under the decorative top fabric, and reflects heat back toward the hot dish.
With insul-bright, the shiny layer is inside the insulation, but you can see it if you look closely. When I make double sided trivets, I don't worry about this. I just use one layer of insulation. If you are concerned about best protection, pay attention to which is the "right" side of the insulation, or add a layer of cotton batting.
SUPPLIES - general sewing - my “must haves”
rotary cutter and cutting mat makes cutting straight lines a snap
large clear sewing ruler I can't say enough about large rulers – I use them in my home remodeling and art projects as well
straight quilting pins (optional) quilting pins are larger than regular pins, so are easier to see
spring action fabric scissors regular and micro tip – I use both; the spring action is a huge assistance when doing a lot of cutting
thread most of my thread is on large serger cones – very economical
ROUND TRIVET WITH BIAS BINDING TRIM
This is another "quick - company is coming" project. I caught myself using old kitchen wash cloths to protect my counter tops from hot casserole dishes. I really had no excuse, since I had stacks of fabric and insulation lying around from previous sewing projects. I decided to take action.
Trivets are quick and easy to make, and make good use of scraps of fabric. Piece fabric scraps to make a trivet, or make from one piece. Make for the holidays, special occasion, party or every day use. For added protection, add a layer of cotton batting.

Holiday Table Trivets
Trivet Size: 7 Inches Diameter Round
I created 7” round trivets, plus a few square trivets (see directions for square trivets later in the article).
Insulation
I used Insul-bright insulation by the Warm Company (see above for information on Insul-Bright). This material provides insulation and heat resistance. You can also use heavy quilt batting.
1/4 yard each insul-bright, decorative fabric, and lining: makes 6 trivets. The fabric must be at least 42" wide. OR use 8" square of each to make one trivet.
8" square of cotton batting (optional - I do not use for trivets)
Round trivet only: 1/2” Double Folded Bias Tape - for outer edge
** To compute the length of bias tape needed for a round trivet, you will have to remember your geometry equations. The circumference of a circle is 2Πr (2 x pi x r). You can use 3.15 as pi. The radius of our circle is 3.5 (half the diameter of 7). Therefore, the circumference is a little over 22";. 2 x pi x radius, or 2 x 3.15 x 3.5 = 22. You need to overlap a bit on the end, so cut your bias tape about 23" for each 7" trivet. If you want to add a loop, add another few inches. If too long, you can trim later to fit.
NOTE: You must use bias tape. That means the tape was created by cutting the fabric on the bias. You can buy ready-made bias tape, or create your own. I sometimes "cheat" and cut straight cuts for edging. I get away with it on short straight edges. This project, however, uses a circle. If the edging is cut with the grain of fabric, you will not be able to make it bend correctly around the outer curved edge, because there will be no stretch. Bias is necessary for adding trim to curved pieces, because fabric has stretch when cut on the bias. That stretch is necessary for going around curves.
Go to: Quilt Lessons to learn how to make your own bias tape.
INSTRUCTIONS
1. Draw A 7” Circle
This circle will be your pattern.
All seams are 1/4”

Finished Round Trivets
2. Cut & Stack Fabric Circles
Using your pattern, cut six decorative top pieces, six insul-bright insulation pieces, and six lining pieces.
Stack as follows: place lining piece right side down on your work surface, then place the insulbright shiny side up over the lining, then place the decorative top piece on top, right side up.
The insul-bright is placed with the shiny side toward the decorative fabric because your hot food dish will sit on top of the decorative fabric. The shiny side will reflect the food's heat back toward the dish.
3. Baste Layers Together
Baste the layers together, very close to the outer edge (this step can be omitted, but it will hold the layers together nicely while you stitch on the bias tape).
4. Pin Bias Tape - to prepare for sewing
Pin the bias tape around the outer edge.

Pin Bias Tape
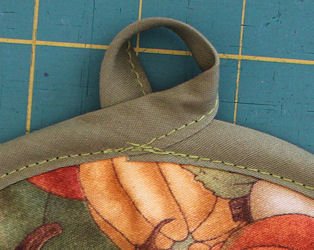
5. Stitch Bias Tape
Stitch the bias tape to the trivet, stitching about 1/8" from the inner edge of the binding. When you get to the end, overlap the ends or create a loop for hanging.
Click on the following 2 photos for larger view on mobile device.

Square Trivet Without Bias Trim
1. Cut Fabric & Insulation
Cut one each lining and decorative outer fabric - each measuring 7.5" x 7.5". Cut one piece insul-bright insulation, measuring 7.25" x 7.5". If you wish to add cotton batting, cut a piece of batting measuring 7.25" x 7.5"
2. Press Under One Edge Of Fabric
Press under 1/4" on one edge of the lining and the outer decorative fabric. Then unfold the fabric. I created two trivets that were reversible. Each had gold print on one side and blue print on the other. I used one piece of insul-bright and didn't worry about which direction the shiny side faced.

3. Layer / Pin Fabric & Insulation
Layer the insulation and fabric as follow:
insulation on the bottom, shiny side up
decorative fabric right side up
lining fabric wrong side up
Line up layers so that the folded edges of the lining and outer fabric are at the top, and the insulation lines up with the fabrics across the bottom and at the sides. The top edges with the folds will overhang the insulation by 1/4".
Pin all three layers together, placing pins close to the outside edge.

Layer Trivet Fabrics
4. Stitch Layers Together
Stitch around all four sides, using a 1/14" seam allowance. Leave the middle third of the side with folded edges open for turning.
Trim all four corners, close to the stitching. Turn right side out by pulling through the opening. Use a turning tool to push out the corners (or the blunt end of a large crochet works well). Press. Topstitch around all four sides, close to the edge. This will close the area we left open for turning. Add quilting if you wish.

5. Turn Right Side Out - Top Stitch
Trim all four corners, close to the stitching. Turn right side out by pulling through the opening. Use a turning tool to push out the corners (or the blunt end of a large crochet works well). Press. Topstitch around all four sides, close to the edge. This will close the area we left open for turning. Add quilting if you wish.

Finished Square Trivet / Hot Pad
Woven Crochet Trivet

Don’t miss our basket weave design crocheted trivet. This is a fast and easy project, using front post double crochet, back post double crochet, double crochet, and a single crochet border. Bulky yarn makes it go SO FAST. I love the rustic look, and basket weave is one of my favorite styles.
Go to Crochet Trivet Pattern
Kitchen Patterns
Organize Your Space
