4th of July Placemat

DIY Projects -> sewing -> kitchen -> holiday
Celebrate Independence Day!
This pattern comes from our former site, CraftAndFabricLinks. Same owners - new site.
Disclosure: This site contains affiliate links. As an Amazon Associate, I earn from qualifying purchases. Clicking on links, and purchasing products, may result in the seller paying us compensation - at no extra cost to you. Affiliate links are in green.
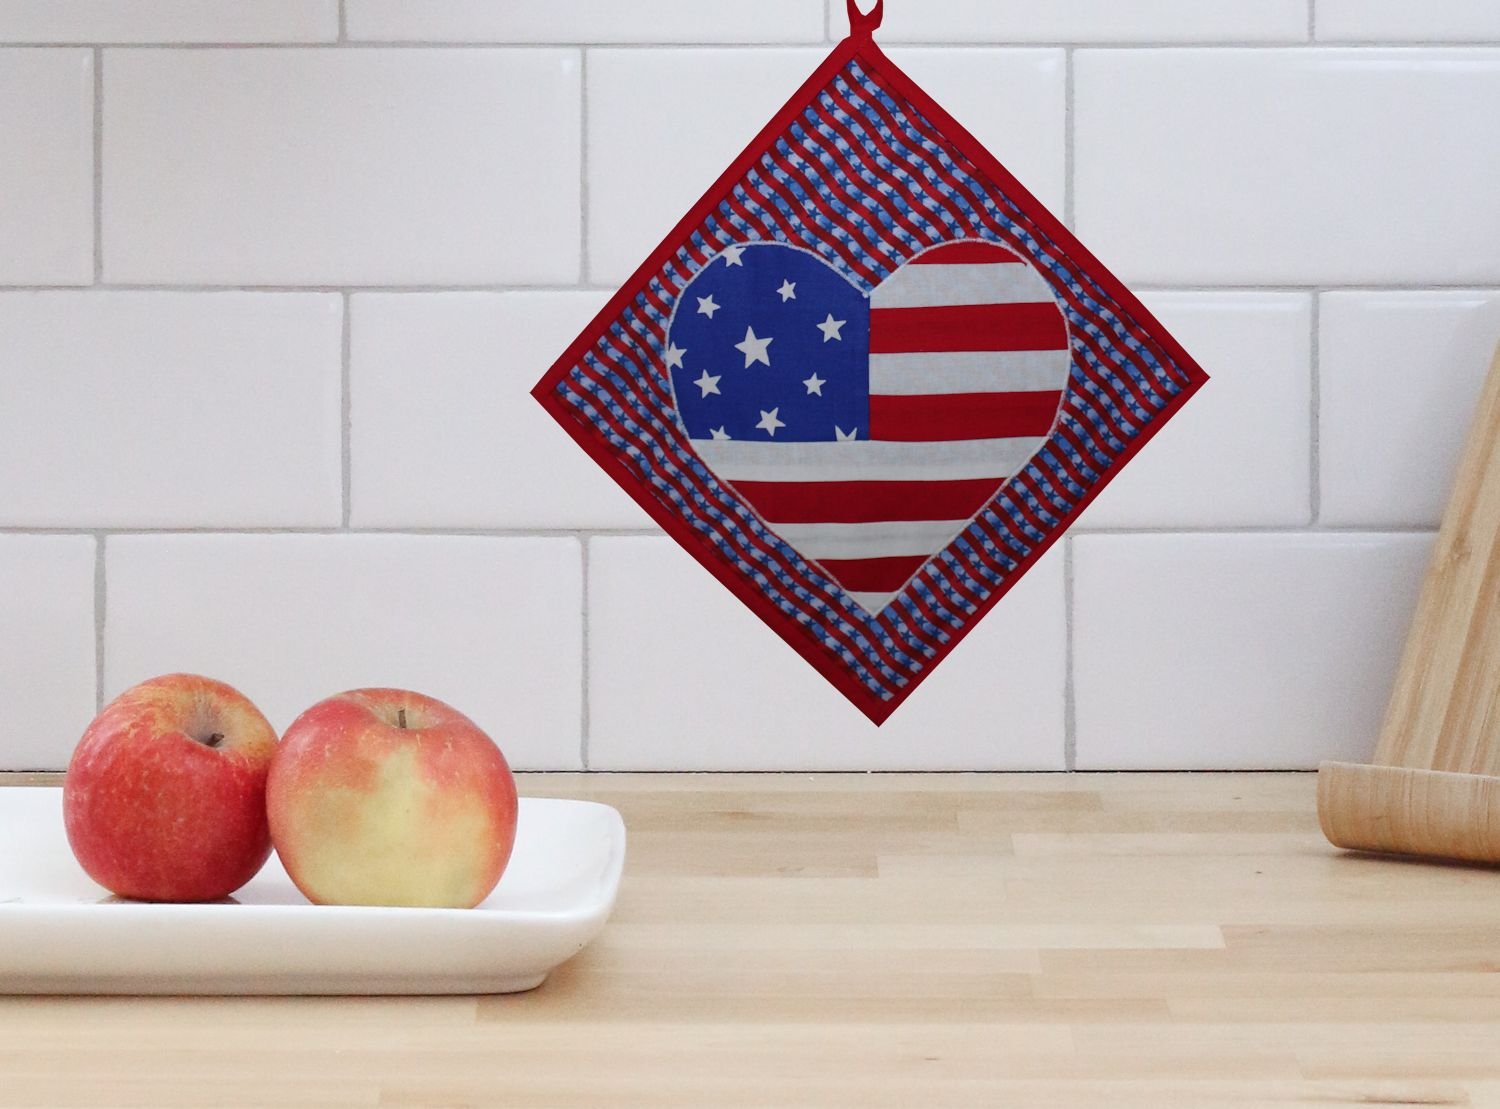
Note: This is one of my original patterns on our previous site. I could only find one ancient photo. Fortunately, I have my diagrams. It is a wonderful pattern; my family enjoyed these placemats for many years.
Also see:
Follow Our Adventures
Easy Sewing Patterns
Fourth Of July
Holiday Projects
3 Versions! Your choice.
Create the placemat as shown above, including a checkerboard tablecloth.
OR create as shown above but use a solid piece for the table cloth.
OR create the placemat with a solid piece in the center (solid block in place of watermelon block).

NOTE: Fusible fleece adds a nice padding. It noes NOT provide insulation. If you need insulation against heat or cold, use cotton batting and Insul-Bright.
Ohio Star & Watermelon
Create this freedom placemat using applique, the Ohio Star quilt block, and checkerboard piecing. The Ohio Star can be used for matching hot pads, table runner, pillow, or quilt. All patterns, text and images © Christina Sherrod of SpruceAndFjell unless otherwise noted.
Placemat Size
14" x 18"
Soft Padding
This project uses Fusible Fleece. This provides nice padding. I often use fusible fleece for this type of project.
Sewing Supplies
I recommend using a Rotary Cutter, Cutting Mat, and Sewing Ruler. I use these tools for most projects. They allow for easy, precise cutting.
thread
sewing scissors
quilting pins
fabric marking pencils
seam ripper
PRE-WASH, DRY, & PRESS ALL FABRIC BEFORE USING
Supplies - makes 4 placemats
NOTE: fabric assumes a 44”-45” width
We have allowed for some shrinkage - you may wish to purchase a bit extra to ensure enough after shrinkage.
16 Ohio Stars

1/2 yard blue (solid or print)
1/4 yard white (solid or print)
Stripes

1/2 yard red (solid or print)
1/4 yard white solid
Watermelon (skip this part if you are doing the Easy Version)

1/4 yard dark green (solid or print)
1/4 yard light green (solid or print)
1/4 yard red (solid or print)
black scraps for seeds (or black fabric paint or fabric marker)

Sky (background) (skip this part if you are doing the Easy Version)
1/3 yard light blue print

Tablecloth (skip this part if you are doing the Easy Version)
1/3 yard blue solid
1/3 yard white solid
NOTE: you can create the table cloth from one piece of fabric, rather than piecing squares)
Binding
Cut binding either 1.5” wide or 2” wide (your preference), and long enough to go all the way around yoiur placemats (about 70” per placemat) - you may piece strips. If you cut straight strips from 44” wide fabric, and you cut your strips 1.5” wide, 1/2 yard of fabric is enough for binding 4 placemats (allows for some shrinkage). Cut 7 strips of 1.5” fabric, each measuring 44”.
Batting or Felt or Fusible Fleece
You need enough batting (or fleece or craft felt) for 4 placemats, each measuring 14.5” x 18.5”. If the felt (or batting or fleece) is a minimum of 34” wide, you will need 1.5 yards.
TIP: Fusible fleece or batting makes layering your placemats quick and easy. Just fuse to your fabric top, then add the backing.
NOTE: Fusible fleece adds a nice padding. It does NOT provide insulation. If you need insulation against heat or cold, use cotton batting and Insul-Bright or other insulation.
Placemat Backing
1.5 yards of backing (this allows for some shrinkage) Your fabric will no longer be 45” wide after shrinkage. That is fine - it just needs to be a minimum of 34” wide. Purchase multi-directional fabric, meaning you can lay your fabric image lengthwise, or selvage to selvage. See “lay-out” on in the Sewing Instructions.
Refer to Assemble & Bind A Quilt for instructions on binding, layering, and backing (in our Free Quilt Lessons).
Fabric Cutting Instructions
NOTE: All seams 1/4". “w.o.f.” means “width of fabric” as it comes on the bolt. The width of fabric will generally be 44”-45”. If you cut a strip that is 1.5” x w.o.f., you will have a strip that is 1/5” x 45”. If you purchase 1/4 yard of 45” fabric, the length of your piece is 9” (1/4 x 36”0, and the width (w.o.f.) is 45”
OHIO STARS
Blue Print:
Cut three strips of fabric 1.5” x w.o.f.
Cut the first strip into 1.5" pieces (you should get 28 squares: 1.5" x 28 = 42")
Cut the second strip into 1.5" pieces (you should get 28 squares: 1.5" x 28 = 42")
Cut eight 1.5" squares from the third strip.
You now have 64 1.5" x 1.5" blue squares, which is enough to make 16 Ohio Stars (four per placemat)
Cut two strips of fabric 2.5” x w.o.f
Cut the first strip into 2.5" pieces (you should get 16 squares)
Cut the second strip into 2.5" pieces (you should get 16 squares)
You now have 32 2.5" x 2.5" blue squares, which is enough to make 16 Ohio Stars.
White Print:
Cut one strip of fabric 1.5" x w.o.f. (width of fabric - your width of fabric is 44"-45")
Cut the strip into sixteen 1.5" pieces
You now have 16 white print squares, each measuring 1.5" x 1.5", which is enough to make 16 Ohio Stars.
Cut 2 strips of fabric 2.5" x w.o.f. (width of fabric)
Cut the first strip into 2.5" pieces (you should get 16 squares)
Cut the second strip into 2.5" pieces (you should get 16 squares)
You now have 32 2.5" x 2.5" white print squares, which is enough to make 16 Ohio Stars.
Set aside your Ohio Star fabric pieces.
RED / WHITE STRIPES
Red:
Cut 10 strips of fabric 1.5" x w.o.f.
Cut eight of the strips into three segments each as follows: two segments each measure 12.5", one segment measures 8.5"
Cut the other two strips into 4 segments each as follows: each segment measures 8.5"
You now have 16 red strips measuring 12.5" x 1.5", and 16 red strips measuring 8.5" x 1.5"
White:
Cut 5 strips of fabric 1.5" x w.o.f.
Cut four of the strips into three segments each as follows: two segments each measure 12.5", one segment measures 8.5"
Cut one strip into four segments each measuring 8.5"
You now have 8 white strips measuring 12.5" x 1.5", and 8 white strips measuring 8.5" x 1.5"
Set aside your stripes fabric pieces.
TABLECLOTH (skip this part if you are doing the easy version - of if you are using one solid piece for the tablecloth)
White: Cut six strips of fabric 1.5" x w.o.f.
Blue: Cut 4 pieces of fabric 12.5 x 5"
5. Lay bottom fabric over top fabric, right sides together. Pin corners. Stitch around perimeter using a 1/4" seam allowance. Leave a four or five inch opening for turning right side out. See diagram at right.
BACKING
Print or Solid for placemat backs: Cut out four 18.5” x 14.5” pieces of backing fabric as shown below. NOTE: Use this same lay-out for cutting out your pieces of craft felt or fusible fleece or batting.

WATERMELON (skip this part if doing the easy version)
Dark Green: Using our template, cut out the dark green piece, using the “A” pattern.
Make another pattern, slightly smaller than A, and lavel it B. Cut out the light green piece, using the “B” pattern.
Make another pattern, slightly small than B and label it C. Cut out the red piece, using the “C” pattern.
Cut out the small seeds from black fabric. OR you can embroidery the seeds, or paint them on using fabric markers or paint. Refer the the photo at the top of this post for ideas on seed placement.
Download Watermelon Template A

Sewing Instructions
Use 1/4” seam allowance. Iron between each step. Read through all directions completely before beginning.
OHIO STARS
This is a very easy way to make the Ohio Star quilt Block. Put your 32 2.5” squares of blue in one stack, and the 32 2.5” squares of white in a second stack. With right sides together, lay a light fabric square over a dark fabric square. You should have 32 sets when finished.
1. Draw 2 diagonal lines on each piece of light fabric; each line runs corner to corner. Sew 1/4” on each side of ONE of the diagonal lines on each set. Cut along the drawn line. Open and press seam toward the dark fabric.
2. Now, lay one square on top of another square, this time being sure that a dark triangle piece is right on top of a light triangle piece, right sides together. Be sure that the seams line up directly over one another. Extend the line onto the dark fabric.
3. Sew 1/4” on each side of the diagonal line. Cut between lines. Open and press. Square down to 1/5” finished squares.
STRIPE BLOCKS
For each placemat, sew two sets of 12.5” red / white stripes, and two sets of 8.5” red / white stripes. Each set should have a red strip, then a white strip, then another red strip. (Your strips are already cut to 1.5” wide)

WATERMELON BLOCK (skip this if you are doing the easy version)
Tablecloth
First, you need to create a tablecloth.
Solid Tablecloth Version
cut one piece of fabric, measuring 8.5” x 12.5”
Checkerboard Version
This is also known as the “mile a minute” form of speed piecing squares for a quilt. To see this used in a baby quilt, go to:
Speed Piece Crib Quilt.
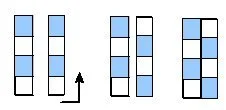
You should have 6 strips of blue and 6 strips of white, each measuring 1.5" x w.o.f. Using 4 strips of blue and 4 strips of white, sew the blue and white strips together as shown below. Each set has 4 strips sewn together, alternating blue and white. Set aside the extra strips you didn't use. You can use them on another project (or as back-up for this project). You should have two stitched sets of blue/white/blue/white strips.

Then, cut the first strip into 26 1.5" pieces. Cut the second strip into 26 1.5" pieces. This will actually give you 4 extra pieces. Cut the third strip into 12 1.5" strips. You will have a total of 64 strips that are made of white and blue blocks alternating. You will need 12 blue/white strips for each placemat (four placemats will need a total of 48).

Once you have your pieces of blue and white squares, arrange them as follows: alternate pieces so that one has blue at the top and the next has white at the top. Sew the pieces together, right sides together. You will end up with a checkerboard, that is 4 squares high by 12 squares long. The total tablecloth piece is 4.5" x 12.5". Trim the upper and lower edges of your tablecloth piece if necessary so they are even. After trimming, the piece may be slightly smaller than 4.5". That is alright because we have allowed extra on the background piece.
Sew your tablecloth piece to your background piece, right sides together. Trim the top of the block if necessary so the entire block is now 8.5" x 12.5".
Watermelon - attach watermelon to sky/tablecloth block
Applique Without Using Fusible Web
Iron under all sides of the applique pieces (layers of watermelon). Place the dark green piece down first, right side up. NOTE: (Optional) If you wish to reduce bulk, you can machine stitch 1" in from the perimeter of the dark green watermelon piece. Turn the block over and cut away the tablecloth layer INSIDE your stitch lines. Your machine stitching will be covered by the other watermelon layers that will be placed on top. Turn piece back over. Applique dark green piece into place. You can applique using hand stitching or machine stitching. If machine stitching, stitch as close to the edge as possible. Place the light green piece over the dark green piece, right side up. Line up the top edges of the light and dark green pieces. Applique into place, stitching the top edge first. Place the red piece over the other two, right side up and applique into place, stitching the top edge first. Applique on the seeds (or embroider or paint them on).
Applique Using Fusible Web (recommended)
To applique without the ironed under hem, simply cut away the 1/4" allowance around the outside of the piece. Use your sewing machine to sew a satin stitch around the perimeter of the piece. Fusible web is helpful for holding the piece in place until it is sewn. If you prefer, you can use a decorative stitch around the perimeter, such as a blanket stitch.
NOTE: To keep the bulk down, you may want to cut away areas of layers that are not needed. For example, after your dark green watermelon layer is sewn into place, you can flip your block over and cut away the checkerboard area that is inside the watermelon stitching. This way, you do not have too many layers.
For more instruction on using fusible web in applique, refer to our Applique Cat Pattern.

Your finished watermelon block should measure 12.5” x 8.5”. If you are making the easy version, this block will be a solid piece of fabric, measuring 12.5” x 8.5”
Assemble The Placemat
Assemble the placemat as follows. Create three rows of blocks, then sew the three rows together. The top and bottom rows consist of Ohio Star blocks on each end of a long row of stripes. The middle tow consists of short stripes on each end of the watermelon block.


Fourth Of July

Learn the Ohio Star quilt block while making this Independence Day placemat with watermelon applique. Included: instructions for solid center block.