Quilt Lessons - page 6
Speed Piecing
Speed Stitching
When several squares or triangles must be sewn, they can be sewn in succession, without cutting threads between sets. This makes the sewing go more quickly. After a string of sets is sewn, the threads between them can be cut. Thread color is enhanced in the photo below.
Get a set of fabric pieces ready to stitch together, laying one layer over the other. Get a second set together and have it ready to stitch right behind the first set, and so on.
Stitch the first set, then immediately place the second set onto the throat plate and continue stitching so that you stitch the second set. Continue on. You do not need to cut thread between sets. You can get many sets stitched quickly with this method.
The following diagram shows 3 sets of fabric pieces that have been stitched in this way. The threads can be cut once a line of fabric pieces are all stitched. Stitch as many as you wish - I usually line up several and keep stitching right on through. This is quick and easy when you have many sets of squares to stitch together.

Strip Quilting
Strip quilting is a great way to very quickly piece together a quilt in an intricate pattern. Many different looks can be achieved. Strips are cut and stitched together, then pieces are cut and re-arranged in various patterns. Experiment with different numbers of rows, different color sets, varying widths of rows, etc.
My Valentine Strip Quilt Block (shown below) was made using the strip quilting method.


Seminole Piecing
Seminole piecing is another type of strip quilting, in that strips are stitched together, cut apart, and then re-arranged. The end result is a diamond pattern. See my seminole pieced glasses case pattern to learn that technique.


Mile A Minute Checkerboard Quilt Piecing
Another variation of strip quilting is called the mile a minute checkerboard. Strips are cut, stitched together, and then cut into strips that are perpendicular from stitched rows. The new strips are rearranged to create a checkerboard. Very fast and very easy.
For a free pattern for a crib quilt in this method, go to: Mile A Minute Crib Quilt.

Squaring Down
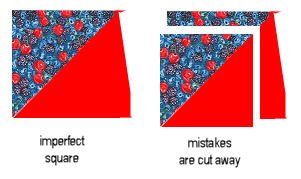
Blocks are often made by piecing together small squares, rectangles or triangles. It is impossible to make a "perfect block" when several pieces of fabric are sewn together to create the block, so blocks are made slightly larger than the finished size needs to be. This is to allow room for error. If seams are made a bit too large, or cutting and sewing are not entirely straight, the block will contain "mistakes". Squaring down corrects most mistakes.
Squaring down evens up the block's sides while also cutting it down to the correct size.
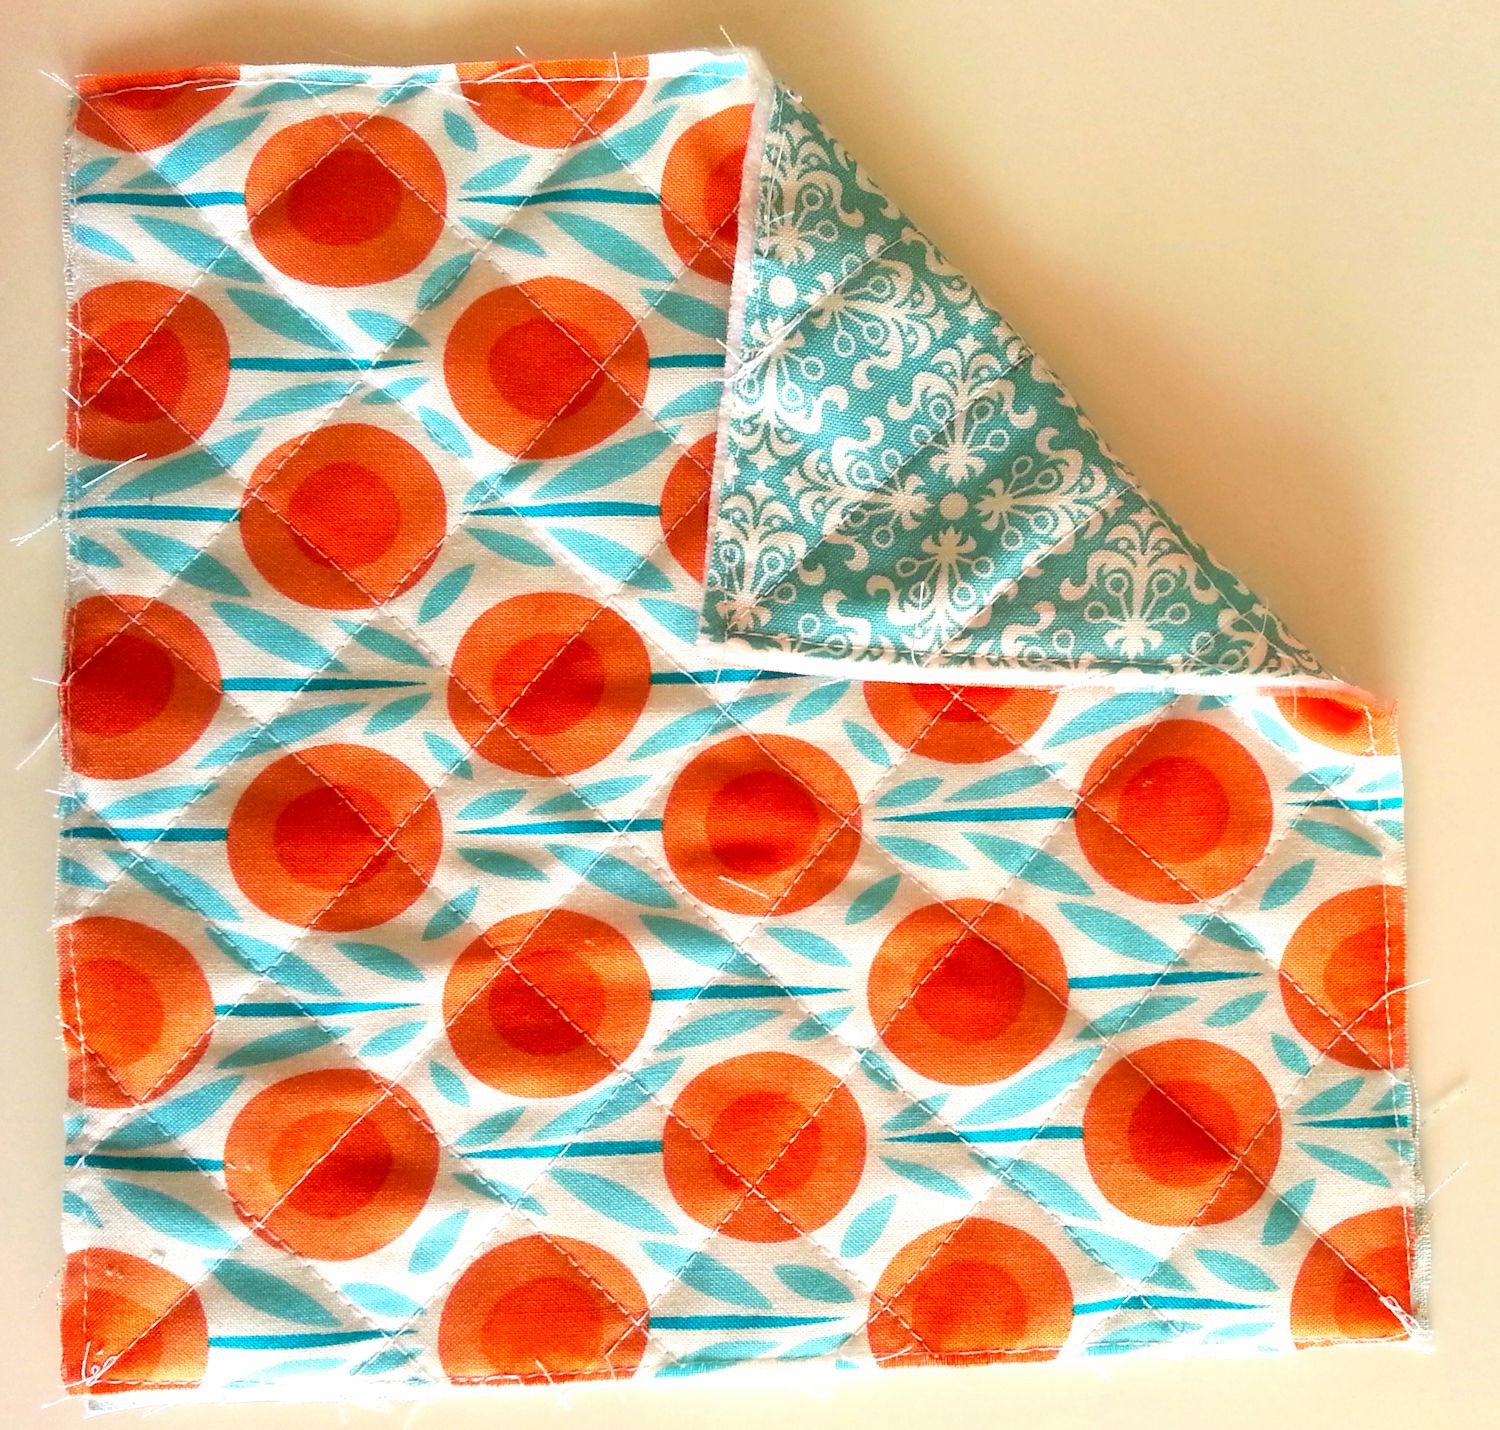
For example, when making a quilt block that is made from two triangles, the finished block must be diagonally divided (seam runs through the block diagonally), perfectly straight on the sides, and exactly the right size. This would not be possible without "squaring down". Quilt block patterns and instructions allow for extra size so that the block can be "squared down". A quilter's square is used to "square down" the block. Excess fabric is trimmed away. I use a rotary cutter, which allows me to keep the quilter's square in place as I trim.
Why Must A Quilter’s Square Be Used?
You cannot merely trim off any side. To keep the pattern of the block correctly proportioned, the trimming must be done in a particular manner. If not cut correctly, a block made up of two triangles might have a diagonal seam that has shifted and is no longer centered. See the images below of a properly trimmed block.
After the excess is cut off the diagonal seam must still run from corner to corner. A quilter's square is a big help in this case. Just line up the diagonal of the quilter's square with the diagonal on the block and then trim the edges of the block evenly. A rotary cutter and mat are very helpful.

Tie Off
If your quilt is too thick for quilting, tying off is a good alternative for connecting layers together. I have used this method when I didn’t want to quilt the piece. Many people use yarn, such as baby yarn, for this purpose. I prefer to use embroidery floss. Tie off the quilt in close enough intervals to hold the quilt securely together (4" intervals at minimum).
Starting on the top side, run the needle and thread down through all layers. Bring the needle back up through all layers. Cut the threads and tie them securely. I leave my ends quite short. Choose a length according to your own tastes.
Tools
Typical quilting tools include a cutting mat, sharp sewing scissors, rotary cutter, quilting pins, seam ripper, and large sewing ruler. I also use sharp “snippers” for cutting threads. Other tools used (not shown) are hand quilting needles, quilting thread and small or large quilting hoop.
Large sewing rulers are 6" x 23" and quilting squares are 6" x 6". I use both for many projects besides sewing. I used them to help square up doors, and place marks for our numerous remodel projects. They are not just for sewing!
Lights are also something to consider. Lighting is extremely important in sewing. Stitching and cutting must be precise. There are now several excellent sewing lights that make seeing those tiny stitches and dark colors much easier. I have special lights attached to the ceiling; they point down at my machines and work spaces. I also place my sewing machines near a large window because I like the natural light. Magnifying lights are also available for close hand work. The magnifying lens with surrounding light is attached to an adjustable arm.
Happy Quilting!
We hope you have found this guide to be useful. Please check out our quilting section for free patterns to practice your new skills on.
All images and text © Christina Sherrod of SpruceAndFjell.com


Adorable doll quilt or quilt block. Prairie girl enjoying her garden along with her dog.