Valentine Strip Quilt

DIY Projects -> sewing -> quilting
Strip Quilting Heart Block
This pattern comes from our former site, CraftAndFabricLinks. Same owners - new site.
Disclosure: This site contains affiliate links. As an Amazon Associate, I earn from qualifying purchases. Clicking on links, and purchasing products, may result in the seller paying us compensation - at no extra cost to you. Affiliate links are in green.
Quilt Block, Pillow, or Wall Hanging
Also see:
Lifestyle Blog
Easy Sewing Patterns
Makeovers For Organizing
Holiday
Learn Strip Quilting

This pattern looks complicated, but works up quickly by sewing strips together. The two upper peaks are merely corners that were cut from the lower sections. The checkerboard is made from strips that have been cut and re-arranged.
The strip quilting part is easy. However, skills required include squaring down a quilt block, and sewing points. For more information, go to our Free Quilt Lessons.
Block Size - with checkered border
Size includes the valentine block, plus the outer checkered border.
14.5” x 15.5”
Cutting Tools
I recommend using a Rotary Cutter, Cutting Mat , and Sewing Ruler. I use these tools for most projects. They allow for easy, precise cutting.
SUPPLIES
PROJECT SUPPLIES
Heart: enough fabric to cut 8 strips, each measuring 11" x 1.5" (I used 6 different prints and repeated two of them)
Background: (I used white) 1/4 yard (this is more than enough, you will need to cut three 5½" x 5½" squares and one 6¼" x 6¼" square)
Checked Border: four strips color A, each measuring 1.5" x 20"; four strips color B, each measuring 1.5" x 20".
Solid Border - optional: (not shown and not necessary unless you wish to enlarge the wall hanging to fit the same slized sleeve used in our seasonal wall hanging series - a shorter hanger going through the sleeve would also work). two strips of solid fabric, each measuring 15.5" x 2.5", two strips of solid fabric, each measuring 18.5" x 2.5".
Backing and batting: 12" x 12" piece if just making the center valentine; if you are adding the checkered border and outer solid border, you will need backing and batting (I use our fusible fleece found in our notions store in place of batting) that measures 18.5" x 19.5".
Hanging Sleeve: 3" x 15.5" strip of fabric.
Binding: 1.5" wide by length equal to perimeter plus about 10" (cut binding for the seasonal wall hanging 1.5" x approx. 90". Sewing Supplies: thread (helpful supplies) sewing ruler, pins, quilter's square, rotary cutter
SEWING SUPPLIES
thread
sewing scissors
quilting pins
large sewing ruler
fabric marking pencils
seam ripper
rotary cutter and mat (optional but nice)
PATTERN
Our heart block patterns will download as pdf files, and will print to an 8.5" x 11" piece of paper.
NOTE ABOUT SIZE:
The files should print triangles that are approx. 5 7/16" across length for the two short size. If the size is different, the pdf file has not printed to the correct size. You can create your own pattern by drawing a 5" x 5" square. Cut it on the diagonal. Then draw new triangles by adding 1/4" seam allowance all the way around your triangle.
PRE-WASH, DRY, & PRESS ALL FABRIC BEFORE USING
Iron between each step. Read through all directions completely before beginning.
NOTE: All seams 1/4"
example color differences
I have made several of these valentine blocks. The photos in the instructions show various blocks, so fabrics change in the photos.
The colors in my example for the border are not appealing, but they show the process well. For my “real project”, I used the black/white color scheme and pink blend fabrics shown at the top of the page.
DIRECTIONS

1. Cut eight strips of fabric, each measuring 1.5" x 11".
2. Stitch the strips together. Trim to 10.5" x 8.5".
3. Print our patterns. Be sure they have printed to the correct size. See "Pattern" above for information on creating the triangle pattern.
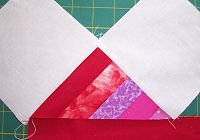
Lay the right triangle in the lower right corner of your strip block.

4. Cut a background piece of fabric 6¼" square. cut it on the diagonal from the upper right to the lower left. Lay the strip piece right side up, with the pattern piece pinned into place in the lower right corner. Place The background fabric triangle right side down on the strip piece so that the fabric overlaps the paper pattern piece. The fabric edge should come to the dashed line on the pattern piece.

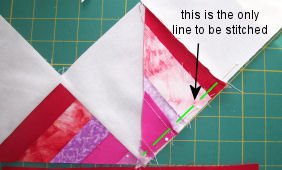
5. Stitch1/4" the the edge of the fabric, right along the edge of the paper. This stitches the background piece to the strip piece, using a 1/4" seam allowance. Pull away the paper pattern (see step 6 below). If you caught the pattern in your stitching, gently pull away the pattern and remove any paper pieces from the line of stitching.
Press seam open. Notice that the background piece crosses the strip piece at precesely 5" on each side at the 1/4" seam allowance. This means that when the entire piece is finished, the background pieces will run 5" up the side and will come to a point at the center of the bottom edge.

6. Repeat step 5 on the left side. Pull away the paper pattern.

7. Press left triangle seam open. Trim the block edges. The block should measure 10.5" wide x 8.5" high at this point.

8. Cut away the underlying strip triangle corners on the right and left side.

Special Note About Points
If you measured precisely, you will have about ½" beneath the point. Be sure that you have at least 1/4" space beyond your base point. This allows for a seam allowance. If you do not have this space, your points will be cut off when the seams are sewn. For more information on sewing points, go to our Free Quilt Lessons: Points - pg 5.
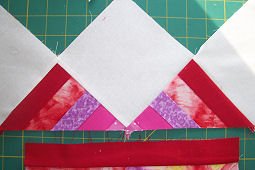
9. Place the points above the upper section of your strips so you can see how the upper peaks of the heart will be formed. The diagonal sides are toward the lower section.

10. Cut three 5½" x 5½" background squares. Stitch one 5½" x 5½" background square to the right side of the left peak

11. Stitch one 5½" x 5½" background square to the left side of the left peak. Press seams open.
12. Stitch one 5½" x 5½" background square to the right side of the right peak (the peaks are not connected to one another yet).

13. Press seams open. The background pieces for the peaks are now in place. The peaks are not yet connected.

14. Pin the right peak to the background piece that is on the right side of the left peak, right sides together (sides are different lengths - line up right peak with background fabric). Stitch and press seams open. See figures below.
15. Pin the upper section (peaks) to the lower section, centering sections, right sides together. NOTE: the upper section is wider than the lower section. That is alright at this point. Be sure the two sections are centered.

16. Press seams open. The heart is now complete. Trim the heart block to 10.5" wide x 11.5" tall. Be sure you maintain 1/4" space beyond all points. If you cannot trim down to 10.5" x 11.5" without losing space around the points, leave your block larger. If your block ends up smaller than my stated size after trimming straight and maintaining the 1/4" spaces, that is fine too. You will need to adjust the border sizes if you block is of a different size. The checkerboard border in this pattern is based on a quilt block that is precisely 10.5" x 11.5".
Use a large sewing ruler and rotary cutter to trim the block. A quilter's square is also helpful. If you do not have these items, carefully mark the block using a ruler and washable fabric marker.

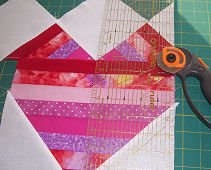
Your Valentine strip quilted block is now complete.
Create Checkerboard Borders
Cut four strips of border fabric, each measuring 1.5" x 20", in color A.
Cut four strips of border fabric, each measuring 1.5" x 20", in color B.
Stitch strips so that you have four pairs, each with a strip of color A stitched to a strip of color B. Press seams.
Cut into 1.5" pieces.

Arrange 11 pieces in checkerboard pattern. Stitch together. Press seams open. This will be one side border.
Make a duplicate for the second side border. In the following photo, I have stitched together sets of 2 squares. I will then stitch the sets together.

Side Borders
Each side border has 11 sets of squares (a set being two squares). Pin one border to a side, lining up checker squares with strips (seams should align where appropriate). Stitch into place. Press open. Repeat on the other side.
NOTE: note that the color on the top left on the left side is the same as the color on the top left on the right side (in this case pink). This is very important. If they do not line up like this, the checker pattern on the top and bottom of the block will not align correctly to the sides.
As I stated above, these are not appealing colors, but they show the process.

Top / Bottom Borders
The top and bottom borders each have 14 sets of squares. The longer borders on the right are the top and bottom borders. Notice that one set is like the side borders, but the other set is the opposite. This is important! Refer to the photos below.

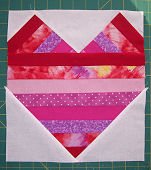
Finished Strip Quilt Valentine Heart Block
At this point, you can use the block for a quilt, pillow front, or wall hanging.

Wall Hanging
I created a beautiful Valentine’s Day wall hanging out of my heart strip quilt block.
To learn how to layer, add binding and hanging sleeve, go to our Free Quilt Lessons.

Quilt Patterns & Lessons


Crafts!


Adorable doll quilt or quilt block. Prairie girl enjoying her garden along with her dog.