Flagpole Installation

GROUND PVC SLEEVE INSTALLATION
for telescoping flagpole
originally on our previous site: CraftAndFabricLinks.com
Project by Kevin Sherrod
Disclosure: This site contains affiliate links. As an Amazon Associate, I earn from qualifying purchases. Clicking on links, and purchasing products, may result in the seller paying us compensation - at no extra cost to you. Affiliate links are in green.
Also see:
lifestyle blog
Craft Projects
Yard & Exterior Projects
Sewing
Secure In Harsh Weather

Fly your flag securely by properly installing the flagpole in the ground. The Arizona desert endures strong monsoon winds, and our flagpole withstood many storms over the years.
Our new flag pole stands through high winds, rain, and snow of the Pacific Northwest. The telescoping pole is easy to lower during storms.
Flag Installation Kit
We purchased our flag and installation kit online from uncommonflagpoles.com . We are NOT affiliated with them in any way, nor do we receive compensation from them for listing their site. We provide the link for information purposes only.
You can also check on Amazon for Ground Installation Flag Pole Kits
Flag Light
Our telescoping flagpole has a solar powered light. It worked well in the Southwest. Now that we are in the darker Pacific Northwest, we find that it works just as well here.

solar light on flagpole
SUPPLIES

Check Amazon for prices. Affiliate links are green.
three 60-pound bags of concrete mix
small rocks for mixing concrete (or coarse gravel)
telescoping flagpole PVC sleeve (this came with our flagpole)
all purpose utility tub we used a tub and rake for mixing the cement
INSTRUCTIONS
Installation will be performed as per the following drawing.
NOTE: image credit for drawing: uncommonflagpoles.com

1. Dig a hole 28” deep by 12” across. Place 6” of small gravel in the bottom of the hole for drainage.
For our first pole (in the Southwest), we pre-mixed the concrete - then poured it into the hole.
For our new pole (Northwest) pre-mixing was not necessary. Concrete powder was sprinkled into the hole, followed by water.
Follow the directions on your bag.
The following two photos show the pre-mixed concrete.

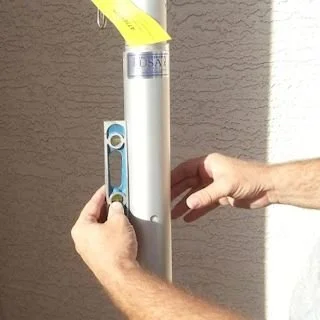
2. Insert the bolt into the sleeve and place the sleeve in the ground. The top edge of the sleeve should be just above ground level. Leave the blue cap in place until after the dirt and concrete have been placed inside the hole.

3. Use the contractor’s level to ensure the sleeve is vertically straight.

The concrete is now poured and smoothed.

4. To ensure the sleeve will hold the flagpole level, vertically, remove the cap and insert the flagpole into the sleeve. Use a level to check the sleeve.
Once you are confident the sleeve is level, allow the concrete to set and cure overnight.
Fly your flags confidently!

Even though quite tall, our pole remains very secure.

Exterior Projects


Yard Decor Projects


Lifestyle Blog
It’s all about enjoying life in a perfect balance.
Organize, minimize, simplify, DIY. Free up time and money for hiking, biking, art, enjoying nature - or doing the things you love.


Protect your wood deck from the elements with proper prep and quality stain. Proper maintenance enhances the life span of a wood deck. Protect from snow, rain, freezing ice, hot sun.