Quilt Lessons - page 4
page 1 page 2 page 3 Page 4 page 5 page 6
Cutting Techniques Continued
Speed Cutting
Speed cutting means that many squares, rectangles or triangles are cut quickly using a rotary cutter, mat and large sewing ruler. If several 4.5" x 4.5" squares must be cut, this can be done very quickly and precisely by cutting one strip of fabric 4.5" x w.o.f. (width of fabric).

For example, lay the large sewing ruler across the width of the fabric. Use a rotary cutter to cut the strip 4.5” wide, all the way across the width of the fabric. Refer to the advertisement at the bottom of the page to see these products. I use these tools extensively.
Then, the strip is cut into 4.5" squares. You have quickly cut several 4.5” squares.
There are several methods of quickly cutting and stitching pieces to create patterns that would be time consuming to create if each square was individually cut and stitched. Two such methods are strip quilting and a variation of strip quilting called mile a minute checkerboard. We cover these methods in another section under Speed Piecing.
Hanging Sleeve
Once your wall hanging is finished, you will need a secure method for attaching it to the wall.
One method is to create a sleeve that runs across the entire width of the quilt. A curtain rod, wood dowel. or similar item can then be slipped through the hanging sleeve. Hooks are placed on the wall to hold the ends of the rod.
The ends of the dowel or rod should extend past the ends of the sleeve, so the rod fits securely in the hooks that are attached to the wall.
I make my sleeves just a bit shorter than the width of my quilt. I use a wood dowel to hold up my quilt. The dowel is fed through the sleeve, and protrudes just far enough from each end of the sleeve to fit through hooks that are attached to the wall. The hooks and dowel are completely covered by the quilt. Refer to the photo.
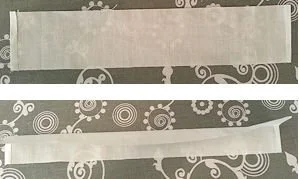
Below is an example of a hanging sleeve.

Hanging Sleeve vs. Hangers
There are two choices for hanging a small quilt or other item on your wall.
In the first method, I attach two or more "hangers", or one "hanging sleeve" to the back of the piece to be hung. If the item is larger, such as a quilt, a hanging sleeve is recommended.
There are many ways to make hangers and sleeves. I am presenting the method that I use. Both hangers and sleeves are made in the same way. The difference is that hangers are only an inch or so wide, and a sleeve runs the width of the quilt.
Hangers or a hanging sleeve can be added before or after the quilt is layered and bound (binding added). Whether you add the sleeve before the quilt is finished, or you attach it to the backing only, depends on whether the quilt will be machine quilted in the area where the hanger will be. The reason is that you cannot quilt through all layers after the sleeve is in place, or you will quilt through your hanging sleeve.
The second method of hanging a small project is to use hanging tabs, and hang it as a banner. Binding is not used - the tabs are stitched between the front and back of the wall hanging or small quilt, or stitched onto the back after the piece is finished. I used hanging tabs on my banner that was hung on my daughter’s bedroom door. The tabs were stitched between the front and back layers.
To see this project, go to: Country Girl & Dinosaur Applique.

Attaching Hangers Or Sleeve AFTER Layering
If your quilt is already layered and quilted, the sleeve cannot be stitched directly to the quilt, through all layers, or the stitching will show on the front.
These instructions make two hangers that are each 1" wide. Cut 2 pieces from your backing fabric, each 3" x 1.5"; iron under 1/4" on each long side. Fold in half (the short way) and stitch a line across the hanger, far enough away from the fold line so that the dowel fits into the tunnel created between the fold line and the line of stitching.

Place the hangers so that their raw edges line up with the top raw edge of the quilt back. The two outside hangers should be about 2.5" from the sides of the wall hanging. Baste across top of hangers 1/4" from top of wall hanging, sewing through all layers. Refer to diagram below. Hand stitch the bottom edge of the hanger to the backing (hand stitching is shown as 'x').
Add your quilt binding (go to page 1 for instructions on binding).
When the binding is in place, run a dowel through your sleeve and hang your quilt on the wall, using small hooks to hold the dowel.
When the binding is in place, run a dowel through the open hanger loops as shown (only a piece of the dowel is shown - your dowel should be long enough to run through all hangers). Use the dowel to hang your wall hanging on the wall. I use a dowel that protrudes a bit past each hanger on the sides of the wall hanging. I slip those ends of the dowel through small brass hooks that are attached to the wall.
A hanging sleeve is made in the same way as the hangers, except that it is longer and wider, it will run almost the entire width of the quilt. If my quilt is 36" wide, I would cut a piece of fabric 4" x 33". I would then follow the instructions above. When finished, the sleeve will be 2" x 32.5" long. My dowel would be 34" long. The photograph below shows a hanging sleeve on a small wall hanging.
Attaching Hangers Or Sleeve BEFORE Layering
For this method, the sleeve is machine stitched onto the backing fabric BEFORE the quilt is layered.
Cut the sleeve fabric 4" wide by the length you need. Press under the ends of the sleeve 1/4". Fold the sleeve lengthwise, wrong sides together, and iron along the fold.
Lay the folded sleeve against the top edge of the backing, raw edges of the sleeve aligning with upper edge of backing. Measure to be sure the sleeve is centered, and it is level. Unfold the sleeve. Machine stitch the sleeve to the backing by stitching along the fold line.
Bring the bottom edge up so both edges of the sleeve align with the top of the quilt. Run another machine stitch parallel to the first line of stitching, far enough away so that your dowel will fit through the tube you create. This creates a strong hold. You can also stitch along the sides of the sleeve ends (leaving dowel area open). Refer to photo.
Layer and bind your quilt as usual. Insert dowel through the hanging sleeve. Install hooks on the wall and place the ends of the dowel into the hooks.
