Quilt Lessons - page 5
Lattice / Sashing
Once your blocks are made and trimmed to the correct size, they must be joined together. They can be sewn directly together or they can be pieced together with lattice (also called sashing) between the blocks. In the photo on the right, the blocks are sewn together with lattice in between to form a row.
In this case, the quilt blocks are stars. I created each star the same, but I turned them to create a spinning affect.
I first stitched short strips consisting of two squares. I stitched a strip between each star block to create a long row of star blocks, joined by the short strips.
Then, I created a long strip of squares to run the entire length of the star/blocks row. Those long strips joined the rows of stars.
I arranged this in such a way that my stars spin no matter which direction you look on the quilt, and the centers look like circles. I call it my “math quilt.” It took some planning!
For this laced star pattern, go to my Laced Star Quilt.
In the following diagram, the yellow strips are the lattice pieces.


Lattice can be omitted entirely, or it can be added only between blocks within a row, or it can be added between rows - it’s your choice.
Change The Size Of A Quilt By Using Lattice
You can vary the size of your quilt by adding lattice, and by changing the width of the lattice.
For example, a King size quilt measures approximately 107" x 108". The free
bear claw quilt block pattern on this site measures 14" x 14" when finished. If you use 3" sashing (lattice) between blocks, a 4" border around the top edge and two side edges, and a 5" border on the lower edge, you will have a finished quilt size of 107" width by 108" length. In the diagram below, you would need a total of 108" in length (purchase 3.5 yards of fabric to be sure to cover this: this allows for some shrinkage as well)for the outer (pink) borders. You will also need 3.5 yards for the lattice between blocks and between rows (this also allows for some shrinkage).
It is useful to draw out your plan as we have done. It does not have to be to scale. We know that each block measures 14". The lattice measures 3" in width, the borders are 4" (top border) and 5" (bottom border). In our sample, 36 (thirty-six) 14" quilt blocks are needed. If you are not using lattice or borders, you will need more quilt blocks. You will also need more quilt blocks if your blocks are smaller. Again, graph paper is a big help at this point. Remember to add 1/4" seam allowance on each side. For example, for a border piece of 4" x 99", you would cut the piece to 4.5" x 99.5" (measure your quilt rows before cutting the long lattice and border pieces in case you need a slightly longer length - some of your blocks may end up slightly larger than 14" if they did not square down perfectly). NOTE: In the photo above, we inserted 3.5" squares into our long rows of lattice.
Our example - border:
Sides: 2 strips 4.5" x 99.5"
Upper: 1 strip 4.5" x 107.5"
Lower: 1 strip 5.5" x 107.5"
Lattice between blocks:
30 strips 3.5" x 14.5"
Lattice between rows:
5 strips 3.5" x 99"

Machine & Accessories
Quilting can be accomplished with a basic sewing machine, but having some "extras" can be a real blessing. Machines designed for quilting have more embroidery stitches than a basic machine (though not as many as a "true" embroidery machine). These stitches can be used for decorative machine quilting. Large work space attachments are available, which are important when you are handling a large quilt.
My Recommendations:
Free Arm
I recommend that the machine have a “free arm.” This means the base that holds fabric can be removed in such a way that a sleeve can fit around stitching area. This is usually standard with machines today.
Differential Feed
The other feature that I consider to be a “must” is differential feed. That means that the fabric is fed from the top AND the bottom. Quilting must be precise. Without differential feed, the top layer of fabric can feed through at a different rate than the lower piece of fabric. You can get to the end of the stitch line, and the two pieces of fabric no longer line us. I ALWAYS use differential feed, no matter what I am sewing.
You might also consider a long arm quilting machine with frame - IF you plan on doing your own machine quilting of a large quilt.
Quilting Foot
A presser foot holds the fabric down during sewing. The type of presser foot I recommend for quilting is a quilting presser foot. Sewing with a very precise 1/4" seam allowance is extremely important when piecing together quilt pieces. Being off just a tiny bit on each piece can make a big difference when you multiply those tiny errors over the entire quilt.
To help keep your seam allowance accurate, a quilting foot is very helpful. The edge of the foot is exactly 1/4" away from the needle. Line up the edge of the foot with the edge of your fabric to keep your seam allowance straight and the correct width. Taping your machine in front of the feed dog area at 1/4" can be helpful if your throat plate is not clearly marked, or if you do not have a quilting foot.
Straight Stitch Throat Plate
Using the straight stitch throat plate is helpful in quilting because it prevents your fabric from being sucked into the machine. A zig-zag plate has a wider opening for the needle to go through, and it sometimes allows fabric to be pulled in. A regular plate has a wider opening because it allows for zig-zag stitches and other stitches with width. When stitching quilt pieces together, you will be stitching with a straight stitch, and do not need width to the throat plate.
WARNING: Only use this type of throat plate with straight stitching! If you attempt something like a zig-zag stitch with this plate, you will break your needle.
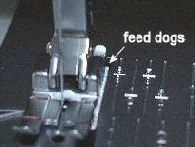
In the following photo, notice that the feed dogs show just a bit on the right side of the quilting foot. This is because the quilting foot comes out to exactly 1/4" width and the feed dogs extend just beyond that.
Notice that the throat plate (second photo) only has one tiny hole where the bobbin thread is coming out.

Points
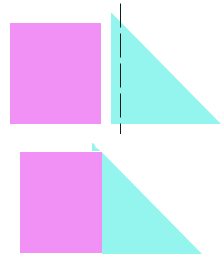
Sewing perfect points in quilting can be a real challenge. Blocks and pieces of blocks are designed to have a 1/4" seam allowance all around the edge. When joining a triangle to a square, 1/4" must be added to each side that contains a point. In the upper set of diagrams at right, the square is cut to 2.5", but the triangle measures 2.75" x 2.75". Why? Because as you move in to the stitch line, the top of the triangle comes down. This must be allowed for. The top photo shows where the stitch line will be. Because extra was allowed, there is room to make this seam on the triangle piece; the top of the seam on the triangle will be even with the top of the seam on the square piece.
The blue/pink diagram shows seams stitched and pressed open.
NOTE: when the first piece of binding (this can be edging or another quilt block) is added it appears that the point has been cut off. That is ok because when the next side is added, the point is back.
When stitching your next piece, your stitch line should run right over the tip of the point.
When you have a finished block containing a point along a side, the point should be 1/4" from the edge.
Refer to the photo below.
When sewing a piece with a point to another block, be sure to sew exactly where the seams of the point cross (which should be 1/4" away from the edge). This way, the point will end up right on the edge of the finished block. Refer to the photo.


Quilting Techniques: Machine and Hand Quilting
The term "quilting" refers to stitching the layers of a quilt together. This can be done by hand or by machine. Traditionalists tend to prefer hand quilting. It takes skill and patience. Stitches should be small (short in length) and evenly spaced. Machine quilting is now being recognized in the quilting community as an alternative to hand quilting. Large, quilting machines can be used or your own sewing machine can be used.
Machine quilting can add strength to your stitches and there is now a very large variety of machine quilting stitches and machines available.
Your stitch pattern can be simple, such as outlining blocks, or sewn in complex designs and patterns.
For intricate patterns, templates are used to draw patterns onto the quilt (in preparation for hand stitching, or home machine stitching). Use fabric marking pencils (NON-permanent) for this purpose. I often use a regular #2 pencil. Test a piece of fabric first, to be sure you can remove the marks. Templates can be purchased or found FREE on the internet. Use graph paper to create your own designs. Large computerized machines do not require designs to be pre-printed onto the fabric.
If you prefer your stitches not show, use "stitch in the ditch" stitching. With this method, machine stitching is done along the line where the blocks meet.
Also see Tie Off on page 6.
Pre-quilted Fabric
Pre-quilting means the three layers are stitched together to create a 3-layer fabric BEFORE the item is made. It creates a beautiful two sided, quilted fabric. It can be expensive to buy, and comes in limited fabrics. I recommend learning how to make your own pre-quilted fabric. I use it for placemats, tote bags, and other items.
Go to DIY Pre-quilted Fabric Lesson to learn how.
Seam Allowance - Quilting Foot & Quilting Throat Plate
Sewing with a very precise 1/4" seam allowance is extremely important when piecing together quilt pieces. Being off just a tiny bit on each piece can make a big difference when you multiply it over the entire quilt.
To help keep your seam allowance accurate, a quilting foot is very helpful. The edge of the foot is exactly 1/4" away from the needle. Line up the edge of the foot with the edge of your fabric to keep your seam allowance straight and the correct width. Taping your machine in front of the feed dog area at 1/4" can be helpful if your throat plate is not clearly marked, or if you do not have a quilting foot.