Applique Sheet Sewing Lesson

DIY Projects -> sewing -> sewing lessons
Create Intricate Appliques
Floral Applique Pattern Included
download free pattern
NOTE: This lesson first appeared on our previous site, CraftAndFabricLinks.com. I apologize for the quality of the older photos that show the steps of the process.
Disclosure: This site contains affiliate links. As an Amazon Associate, I earn from qualifying purchases. Clicking on links, and purchasing products, may result in the seller paying us compensation - at no extra cost to you. Affiliate links are in green.
Also see:
Articles & Tips
Applique
Sewing Lessons
Home Improvement
What is an Applique Pressing Sheet?
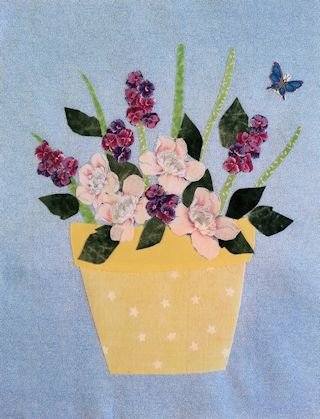
An applique pressing sheet makes it quite easy to create layered, intricate applique. The pieces are fused together first, then ironed onto the main fabric (the layer the applique is being attached to, such as a quilt block). Use the instructions to learn the technique, or use the instructions, plus my free floral applique pattern, to create a beautiful pot of flowers
Creating The Applique: a 2-step process
Step one: fusible web (adhesive) is ironed onto the WRONG side of fabric. Designs are drawn onto the paper side of the fusible web. Then, the applique pieces are cut from the fabric that is now backed with the fusible web. The paper backing is then removed from all of the applique pieces.
Step two: The pieces are arranged on the applique pressing sheet. The applique pressing sheet is transparent, so patterns show through from beneath the sheet. An iron is used to fuse the applique pieces together.
Simply peel your new, multi-piece applique off the applique sheet and iron it onto your project.
Detailed, multi-pieced, layered applique made easy!
Read through all instructions below to learn this process.
Many Uses For Your New Applique
The applique can now be fused (pressed with an iron) to card stock, fabric, tee shirts, and other surfaces that are suitable for fusible adhesive (fusible web).
Floral Pattern
For this project, I am providing a FREE floral pattern. It will create a beautiful, multi-layered pot of flowers. I first created the multi-piece applique, then fused it to my already prepared flower pot block.
Floral Block Size
This pattern creates one floral block, measuring 8.5” x 11”. Enlarge or shrink the pattern for your needs.
Supplies
FABRIC
One 8.5” x 11” piece of background fabric (I used blue)
Scraps of fabric for flowers, leaves, and flower pot. I used two different floral prints, two green prints for grass/stems, and a dark green print for leaves. You can use small, medium, and large floral prints if you wish. The key is to have various shapes and sizes of flowers. Use what looks good to your eye. Try to choose prints with complete flowers to cut out. I added a butterfly, which provides nice detail. You can add bugs, trim, grass around the base, etc. Experiment with your own designs. Free motion embroidery creates nice grass.
PRE-WASH ALL FABRIC. Do NOT use fabric softener. Washing will remove any sizing, which will allow for a stronger bond.
OTHER
This is a special type of sheet, used for creating detailed appliques. The pattern is placed on a working surface. The pressing sheet is placed on top of the pattern, which can be seen through the sheet. Applique pieces are placed on the pressing sheet. When the pieces are bonded with fusible web, they will stick to one another, but not to this sheet (they slightly stick - just enough to stay in place). When the applique is finished, it is easily peeled off the sheet and is ready to iron onto your background fabric.
Fusible Web (also called heat activated adhesive - I used Heat N Bond Lite)
large sewing ruler (optional but nice to have)
scissors or rotary cutter and cutting mat
pins
pattern (use our free pattern, or free hand draw a pattern, or use pattern of your choice)

download free floral pattern (if you haven’t already done so)
NOTE: My pattern shows general lay-out, and provides the pattern pieces necessary for the pot. Cut flowers, butterflies, and other objects from fabric - or draw them free-hand. Use my general leaf outlines as a guide for creating leaves. If you would like a ready-made pattern, use the flower instructions I provide on my Happy Day Applique.
Directions
NOTE: you will need 2 copies of the pattern
Print 2 copies of the pattern. Use the first copy as pattern pieces for steps 1-3; the second copy will be placed under the applique pressing sheet (step 4).
1. Cut Fabric Pieces / Fuse Adhesive
Cut fabric pieces large enough for your flowers, leaves, flower pot pieces, etc. Cut pieces of fusible web (heat activated adhesive) large enough to fit your fabric pieces.
2. Iron Fusible Web To The Wrong Side Of Your Fabric

These are the instructions for Heat N Bone LITE: Using a dry iron set on the “silk” setting, iron the rough side to the WRONG side of the fabric for approximately 2 seconds. You will be ironing on the paper side of the Heat N Bond. Follow the instructions for the fusible web you are using.
Repeat the process of fusing the adhesive to the wrong side of all fabrics: flower pot, flowers, stems, leaves, plus any bug or othyer items you are using (such as my butterfly).
Use the second copy of the pattern to cut out a pattern for the flower pot pieces (ignore the leaf designs on the pot).

3. Cut Out Fabric Pieces
Place the paper pattern pieces onto the paper side of the fabric. Trace the pattern onto the paper of the fusible web. Cut out all fabric pieces: flowers, leaves, stems/grass, trim, butterfly, etc. Cut out the flower pot pieces. Again, ignore the leaves on the top piece of the pot.
4. Create Multi-Piece Layered Applique
Lay down the 2nd 8.5” x 11” pattern (your uncut pattern). Lay the applique pressing sheet over the pattern. You will be able to see the pattern under the pressing sheet. Peel off the paper backing on the fabric pieces. Using the pattern as as guide, lay out yoru pieces in the following order:

flower pot base
stems / grasses
flower pot top
flowers
leaves
trim (butterfly etc)
5. Peel Off Your New Layered Applique
When happy with the placement, (for Heat N Bond), use a dry iron set to “silk” setting and iron down the pieces, pressing with the iron approximately 6-8 seconds. NOTE: Do this on an ironing board or other surface that can take some heat. The pressing sheet will protect surfaces, but I found that my cutting mat started to warm a bit when it was under my pressing sheet as I ironed (my iron was turned up higher than necessary at this point). The nice thing about Heat N Bond LITE is that it works with a LOW iron heat setting. Follow instructions for your fusible web.
When finished, you will have a large applique that consists of a flower pot with flowers, stems, and all other pieces.

6. Use Your New Applique
Place the Applique on your background fabric. Use a dry iron set to “silk” and press approximately 6-8 seconds. That’s it! You can now finish the edges with fabric paint or stitching if you desire - if you wan tto ensure a strong hold (if your item will need to be washed often). I found this held up very well for my wall hanging project, In fact, I tried to remove one flower to change the placement and it wouldn’t budge.


I used this same pattern to create a spring floral watercolor painting. Instructions, list of supplies, and 6 minute video included!
Sewing Lessons


Articles & Tips


Set of 4 gift bags from one yard of fabric. Accessory or gift. 3 sizes plus a wine bag. Super easy - beginning sewing project.