Happy Day Applique

DIY Projects -> sewing -> lessons
APPLIQUE LESSON: pattern plus instructions on using Fusible Web.
This pattern was originally on our previous site, CraftAndFabricLinks.com.
Disclosure: This site contains affiliate links. As an Amazon Associate, I earn from qualifying purchases. Clicking on links, and purchasing products, may result in the seller paying us compensation - at no extra cost to you. Affiliate links are in green.
Also see:
Articles: tips & adventures
Floral Projects
Applique Patterns & Lessons
Craft Projects
Applique Lesson
This pattern was originally on our previous site, CraftAndFabricLinks.com.
For this lesson on applique, I created my "Happy Day Applique". Specific instructions for the wall hanging follow the lesson.
While stitching it together, I was occasionally glancing out the window of my sewing room. Lizards were sunning themselves on the rocks (I lived in Arizona at the time), birds were singing, and it was a beautiful day. I thought, "What a happy day this is." Hence the name.
Applique is easy when using fusible web, also called fusible adhesive. The fusible web is ironed onto the wrong side of the applique fabric. A pattern is drawn onto the paper side of the fusible web. The applique piece is cut out. The paper is peeled off, and you now have an applique piece (fabric) with adhesive on the wrong side. It can now be ironed onto the background fabric. Easy and quick! The web also adds stability to the edges of the applique fabric (helps prevent fraying).
Fusible Web Uses
Use fusible web to add fabric lettering or fabric pieces to just about any surface, including paper, fabric, cardboard, etc.
Fusible Web Instructions
There are two steps to using fusible web (also called iron-on adhesive). The first is to attach the adhesive to your the wrong side of the transfer piece (the applique piece). The web (on the wrong side) acts like a glue, once it is heated by an iron.
The second step is to iron the applique onto your garment.
If you are creating an intricate applique, with many pieces, it is best to adhere them all together before adding them to the main piece. This is done with the use of a pressing sheet. I will soon be adding instructions on how to use a pressing sheet.
Once the applique is in place, the edges can be reinforced with stitching - or left as is. I recommend reinforcing if the item will be washed multiple times.
SUPPLIES - Applique Lesson
General Applique Supplies: sharp scissors, quilting pins, large sewing ruler, seam ripper, Fusible web (also called iron-on adhesive, or fusible adhesive), fabric for applique, machine embroidery thread (optional: for stitching around the applique), applique pattern (to trace onto the paper backing of the fusible adhesive).
1. Draw The Applique Pattern Onto The Paper Backing
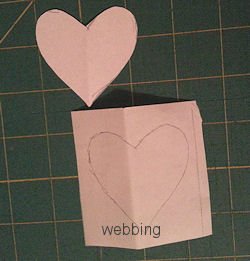
Cut a piece of fusible web (such as Heat N Bond or Wonder Under - also called iron-on adhesive) large enough to cover your fabric design. I created a heart applique piece by drawing a heart onto a 2" square piece of paper. I then traced it to the paper backing of the fusible adhesive (fusible web).
2. Fuse Adhesive To Applique Fabric Piece
Follow the directions on the iron-on adhesive. Be sure that the rough side is next to the back of your fabric. The paper side should be toward your ironing board (away from the fabric piece, because it will be pulled off).


3. Fuse Applique Fabric
Cut out the applique piece, following the lines you traced previously (in my case, a heart).
Peel off the paper backing from the applique piece. Position the applique onto the surface you wish to adhere it to. Following the directions for your fusible adhesive, press with an iron. The adhesive will activate and the applique piece will not be fused to your background piece.
4. Finish The Applique Piece

If the item is not going to be laundered, or used heavily (such as a wall hanging) you can leave it as is. For heavier use, I prefer to stitch around the perimeter of my applique pieces. I set the zig-zag stitch width to very narrow, and the spacing to very close.
The flower shows satin stitching around the edges of the flower applique. It adds nice detail. I also used satin stitching to create a stem. I went on to stitch around the inner circle, but posted this photo so you can see the difference.
Special Note About Letters
If your project calls for letters, trace the letters backwards onto the paper side of the fusible web. When the letters are cut out and flipped right side up, they will no longer be backwards. Note that the “Kiss Me I’m Irish” is backward in the photo below.

Happy Day Wall Hanging
Wall Hanging Size
The finished size of the item is 23.5" x 9.5"
SUPPLIES
General Applique Supplies: sharp scissors, quilting pins, large sewing ruler, seam ripper, Fusible web (also called iron-on adhesive, or fusible adhesive), fabric for applique, machine embroidery thread (optional: for stitching around the applique), applique pattern (to trace onto the paper backing of the fusible adhesive).
For This Project:
Use fabrics of your choice. I will refer to fabrics I used.
Flower blocks (two blocks):
2 pieces white background fabric, each measuring 6.5" x 9.5"
6 pieces of fabric for flowers, each measuring 2.5" x 2.5"
2 pieces of fabric for vases, each measuring 2" x 4"
Basket Block:
1 fat quarter for basket and handle (22" x 18")
9.5" square of fabric for background
1 piece of fabric measuring 2" x 2" for heart
2 pieces of fabric for bordering the basket block, each measuring 1.5" x 9.5"
Other Supplies:
machine embroidery thread (I used variegated green for flower stems, variegated oranges for flower center, gold for basket, white for heart and flowers)
thread to match background (for stitching blocks together)
binding, batting, & backing fabric (enough for a finished item that measures 23.5" x 9.5")
Fabric for hanging sleeve (I made a sleeve from a strip of backing fabric measuring 3" x 14.5")
DIRECTIONS
1 . Create Basket Block
Go to: Trivet-appliqued quilt block and complete steps 1-5. NOTE: This is the second project in the article, not the pieced quilt block. Do not layer or add binding. You just need the basket block.

Spring Basket Trivet
2. Create Flower Pieces

Cut a piece of paper 2.5" square. Draw a flower on it similar to mine. When you are happy with the pattern, trace six of them onto the paper side of fusible web. Using an iron, fuse the web onto the wrong side of your flower fabric.
Cut out the flowers. Peel off the paper backing from the applique pieces.
Flower Center: If you wish to add flower centers, cut six round circles for the centers. Iron fusible web onto the wrong side of the circles. Peel off the paper. I had fabric that had a design of circles - perfect for this project.
3. Make Two Floral Blocks
Following the same instructions as in the spring basket, create vase and flower appliques. The vases are 2" x 4" pieces of fabric.

I placed my vases 1.25" up from the bottom of the block, and 1.5" in from the side of the block. I arranged my blocks so they were opposites. The vase was to the left on the left block, and to the right side on the right block. Arrange yours per your tastes.
Fuse the flowers and vase to the background piece (6.5" x 9.5").
I used a pencil to lightly draw stems from the vase to each flower. I then used a machine satin stitch to outline the flowers and flower centers. I also used a machine satin stitch to create the stems.
Importance Of Stabilizer
Place stabilizer under the piece you are machine embroidering. It will add stability to the fabric being embroidered. Without it, the embroidery will probably not be optimal.
Finish The Wall Hanging
Cut two strips of fabric, each measuring 1.5" x 9". Stitch them onto each end of the basket block, right sides together, using a 1/4" seam allowance. Press seams toward strips.

Stitch a floral block to each side of the basket block, using a 1/4” seam allowance. Press seams.

Layer, bind, and add a hanging sleeve.
For instructions, go to: Quilt Lessons
Quilts & Blankets


Adorable doll quilt or quilt block. Prairie girl enjoying her garden along with her dog.