Intarsia Crochet Trivet

DIY Projects -> sewing -> crochet
Woven Design Intarsia Crochet
Skill level: intermediate
Disclosure: This site contains affiliate links. As an Amazon Associate, I earn from qualifying purchases. Clicking on links, and purchasing products, may result in the seller paying us compensation - at no extra cost to you. Affiliate links are in green.
Also see:
Lifestyle Blog
Sewing Lessons
Kitchen Projects
Embroidery & Crochet
Trivet Size
My trivet measures approximately 8” wide x 8” high.
It is 26 sc wide x 29 rows high.
I used a size I crochet hook. I tend to crochet a bit tight, so size I worked well for me.
The size is not real important. It is important that the stitches not be too loose or too tight. Use the hook that works well for you - and for your yarn.
NOTE: To create a table trivet, crochet a second piece of the same size. That will be the back piece. It can be all sc, double crochet, or whatever stitch you prefer. I crocheted my back layer using double crochet. The important thing is that it be exactly the same overall size as the top layer. Refer to Instructions below.
Intarsia Crochet - woven design
I call this a woven design because each line of black (or white) runs UNDER the other color on one end, and runs OVER the other color on the opposite end, giving the appearance that the ribbons of color have been woven in.

woven design crocheted trivet
This weave design is accomplished by using intarsia crochet. Bobbins are created for the black and white yarns. I created a gray bobbin for one small area; other than that, I used it directly from the ball. The following photo shows two black bobbins.

This woven trivet intarsia crochet pattern is a bit more advanced than my Christmas tree pattern because it it is not symmetrical in design. That means that the right half of the design is not a mirror image of the left half of the design (my tree pattern, shown below, is symmetrical).
I recommend making up the Christmas Tree Intarsia Crochet first. The pattern is symmetrical, so you don’t have to worry about working a row backward from what you are looking at on the pattern. In that pattern and lesson, I explain the difference between intarsia and tapestry (carrying yarn), and I show how to work with yarn bobbins.
I also have a refresher on how to start your chain: create the slip knot and work up your foundation chain.

Scandinavian minimalist tree design in single crochet
With this woven intarsia crochet pattern, which is asymmetrical (one side is not a mirror image of the opposite side), you must pay attention to which direction you are going when creating each row. When looking at the diagram of the pattern, odd rows follow the diagram right to left. At the end of the row, you would chain one and turn your piece over (as you would normally do in crochet). You are still crocheting from right to left, but you are now on the WRONG side of the piece, so now you must follow the diagram from left to right. You will understand once you get going. The odd rows are always the RIGHT SIDE for this project, and the even rows are always the WRONG SIDE.
EXAMPLE:
look at the following grid design below
Row 2: background color sc 2, gray sc 2, background color sc 18, gray sc 2, background color sc 2. Follow the diagram from left to right because row 2 is an even row. Total 26 stitches.
Row 3: red sc 22, gray sc 2, red sc 2. Follow the diagram from right to left because row 3 is an odd row. Total 26 stitches.

intarsia crochet: woven design
Provided in this tutorial:
For this piece, I provide the grid of stitches in a diagram. I do not provide written directions. That is why I recommend that you start with the tree pattern listed above. See “Supplies” below to download my grid pattern.
I work from a grid. You can also jot down written directions if that is helpful for you. I recommend marking each row on the grid as you complete the row, so you know exactly where you are in the design.
Remember Always!
End a row with chain 1, turn. That will count as the first sc of the next row. If a row calls for 26 sc, your chain 1 is the first sc - you would need to sc 25 more stitches.
Video Lessons: youtube is a great place for learning
I am not showing how to create these stitches. There are numerous, very good YouTube videos that show it very clearly. This is an example. It is not my video, and we are not affiliated with the creator in any way. I like the video, and provide the link for your convenience. video: Intarsia and Tapestry Crochet Tutorial
sc: single crochet
bobbin sc: I use this to designate that you need to switch to a bobbin yarn for your next set of sc
ch: chain
ch 1: chain 1 for turning (always end a row with ch 1, turn: this always starts the next row and is your 1st sc of the new row)
SUPPLIES
PATTERN
I provide a free grid of the design to download. I also provide the grid with the bobbin areas I used outlined for you.
Download Basic Grid Trivet Pattern
Every row is done only in sc.
Ch 1 at the end of every row. That ch 1 will be the first sc of the following row.

net weight 3.52 oz - 164 yd
COTTON YARN
If you are making a dishcloth, table trivet, or other item that will be washed, or will get a lot of use, I recommend using a strong cotton yarn (100 percent is great). You can find it here: cotton dishcloth yarn . Yarn Bee, Caron, Lion Brand all make good yarns. Check product descritpion to be sure it is COTTON.
I recommend the brand and type shown in the photo (black), or the Lion Brand 24/7 yarn shown in my dala horse pattern.
My white yarn was the same brand and type that I used for my Dala Horse. My black yarn was the one shown in the photo. I was very happy with both yarns.
For gray, I used a new yarn. I was not as happy with it, because it frayed and split while I was working with it (it was a cheaper yarn and was labeled as “soft”). It had a softer feel, and was cotton, but it wasn’t very strong. I like my new trivet, but I will stick with the stronger cotton yarn in the future.
Crochet Hook
The yarn called for a size I crochet hook . I crochet a bit tight, so tend to choose a size larger than what the pattern calls for.
Use what works best for you - the important thing is to obtain the correct overall design that is not too tight and not too loose.
Intarsia Crochet Bobbins
Intarsia crochet requires a yarn bobbin to hold yarns for colors brought in by the intarsia method. You can purchase bobbins, or create your own bobbin using cardboard. For my first project, I created a cardboard bobbin. After that I purchased bobbins on Amazon.
In tapestry crochet, the yarns are carried and one yarn is switched for another to create patterns. Intarsia uses yarn bobbins.
Note: I used gray as my background (not white as in the pattern), and my contrast colors were white and black (rather than gray and red). Otherwise, I followed the pattern exactly.
When ending off a bobbin, leave a tail of yarn that is about 4” long. You later weave that into the piece to secure the end of the yarn.
DIY Yarn Bobbin
Refer to my Christmas Tree Intarsia Pattern to learn how to create your own yarn bobbin using cardboard. For my first project, I created a cardboard bobbin. After that I purchased bobbins on Amazon.
Tapestry Needle
I used a bent tip tapestry needle to weave my ends in.
Directions
For a refresher on starting your slip stitch, creating your foundation chain, using yarn bobbins, and changing colors, refer to my Christmas Tree Crochet Pattern.
EACH ROW IS 26 STITCHES ACROSS, all sc. There are a total of 29 rows.
After each row, ch1, turn. The ch 1 will be the first sc of the new row.
1. Print the free grid design & bobbin map
NOTE: I show 8 bobbin areas on the bobbin map. You don’t actually need 8 bobbins because when you end off a bobbin, you can use the same bobbin for another area. For example, when you end off bobbin 3, you can re-use that same bobbin for bobbin 6.
2. Create Top Layer
Follow the grid pattern to create your top layer. Decide which side you wish to use as your “right side.” It should look basically the same on each side, but sometimes I like one side better than the other.
Secure Yarn Tails
Place your hook on the WRONG SIDE of your work, push the hook to the front (right side), grab the yarn tail and pull it through to the back. Using a tapestry needle (I prefer a bent needle), weave in all yarn tails on the WRONG SIDE of your piece. This secures all yarn ends.
The following photograph shows my completed top layer, with the yarn tails not yet woven in.

3. Create Bottom Layer
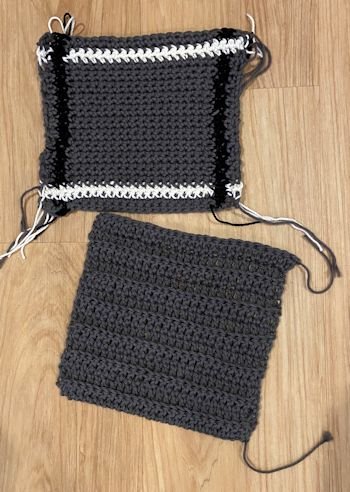
Create a second layer that will be on the bottom layer for the trivet. This can be all sc, dc, or whatever stitch you prefer. The important thing is that it be exactly the same size as your top layer. I used dc for creating my bottom layer. I did not need as many rows, since it was dc. It is on the underside of the trivet and will never show. If making it up in all sc, you would need 26 stitches across by 29 rows.
NOTE: if you use a different yarn, stitch, or hook size than what you used on your top layer, you may need a different number of stitches or rows. To be safe, use the same size yarn and hook.
Finishing Your Trivet
When both layers are complete, place the layers WRONG SIDES TOGETHER. I used little clips to hold them together. Use a slip stitch to stitch the layers together. I used a slip stitch around the outer edge. You could also use a different stitch, such as sc.
Related Projects

Snuggly Scarf

Fully illustrated embroidery stitch glossary.
Learn the art of huck weaving. Lesson and 2 free patterns.
Lifestyle Blog - inspiration


Nature provides equal access to the magnificence of wild places. Joy and entertainment are not purchased; they are experienced.