Match Plaids

DIY Projects -> sewing -> lessons
Tutorial: working with nap, fabric direction, & plaid prints
originally on our previous site: CraftAndFabricLinks.com
Disclosure: This site contains affiliate links. As an Amazon Associate, I earn from qualifying purchases. Clicking on links, and purchasing products, may result in the seller paying us compensation - at no extra cost to you. Affiliate links are in green.
Also see:
Notes From The Workroom & Trail
10 Easy Sewing Projects
10 Simple Stress Busters
Clothing and Accessory Patterns
Plaids, Nap, & Direction
Matching plaids at seams creates a nicely finished item, and is a sign of quality clothing. It is not difficult to do, once you know the proper technique.
Fabric with directional print or nap needs special consideration when laying out pattern pieces. Extra fabric is required.
Read the following tutorial to learn about plaids, direction and nap.
Allow For More Fabric - nap, directional fabric, and plaid

If a fabric has texture, it has nap. Velvet has nap, and the fibers usually lie in one direction. If you run your hand along velvet in one direction, it will feel smooth. When you run your hand in the opposite direction, the fabric surface feels quite different. Light reflects differently depending on the direction of the fibers, so fabric lying with nap in one direction looks quite different from the same fabric with fibers lying in the opposite direction. Therefore, it is extremely important to lay your pattern pieces in the same direction when working with nap.
Fabric might not have nap, but still be directional due to the print. If the print pattern is in one direction, all pattern pieces must be laid out in the same direction. For example, if you are working with fabric that features elephants whose heads are all pointing in the same direction, lay your pattern pieces on the fabric in such a way that the elephants will all be in the same direction. A finished garment with an area that has upside down elephants would be quite noticeable.
If you are matching plaids, you must be careful how you place your pattern pieces, because the plaid lines need to match up at the seams.
When you are working with nap, directional fabric, or plaids you must allow for more fabric. This is usually noted on the pattern. For example, the pattern might call for 2 yards without nap and 2.5 yards with nap. Use the "with nap" amount if you must match plaids or direction.
Matching Plaids
Matching plaids is not really difficult, once you learn the tricks. Matched plaid is a sign of quality clothing. Wherever sections meet at the seams, plaid lines should line up correctly.
In the illustrations below, the pj's on the left show unmatched plaid. If you follow a red line all the way across the seam line (represented as blue dash line), you will see that the red line does not meet on each side of the seam. The pj's on the right show plaid that is properly matched (plaid lines are aligned on each side of the seam).
The image below shows unmatched plaid vs matched plaid. The blue dashed line shows the center seam, where the plaid is supposed to match up.


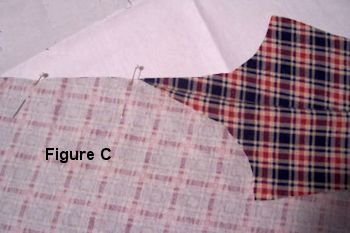
To match plaids, lay out your fabric so that it is folded lengthwise, right sides together (Figure A). Open it up in several places and check to be sure that the plaid lines on the top layer line up with the plaid lines on the bottom layer. Red lines on the top layer lie directly on top of red lines on the bottom layer. Blue lines on the top layer lie directly on top of blue lines on the bottom layer, etc. Pin the layers together in several places to keep the layers lined up correctly. In the illustration on the left below, the fabric is folded right sides together (grey is wrong side). Figure B shows an edge of the fabric turned up. Layers are aligned so that the plaid on the top exactly lines up with the plaid underneath. When you pin down your pattern piece and cut through both layers of fabric, you will be cutting from identical pieces of fabric. Figure C shows the upper layer's edge turned back so you can see that the layers are aligned perfectly. In figure C the pattern piece is the pj's front. When the center front seam is sewn, the plaid will match perfectly across the front seam.
To match the side seams, you must be sure that the pj pant's back pattern piece is placed on a fabric area that is identical to the fabric area the front was cut from. For example, The outer seam that runs over the hips and down the outer edge will be most noticeable. If the top of the front piece's outer edge started with a blue stripe and the hem area ended with a red stripe, you need to place your back pattern piece so that the top starts with a blue stripe and the hem area ends with a red stripe. This way, when you sew the back to the front along the outer seam the front and back will exactly match at the outer seam. A blue stripe will run across the seam at the top, and a red stripe will run across the seam at the edge of the hem.
Matching plaids might take a bit of practice, but it is not really that difficult. Next time you are looking at “ready made” clothing, check to see if the plaid was matched (lined up) correctly.
More Sewing Lessons


Lifestyle Blog


Set of 4 gift bags from one yard of fabric. Accessory or gift. 3 sizes plus a wine bag. Super easy - beginning sewing project.