Mini Quilt Coasters

DIY Projects -> sewing -> kitchen
Adorable 4” mini quilts - 3 designs
These make adorable coasters - or a doll quilt!
originally on our previous site: CraftAndFabricLinks.com
Disclosure: This site contains affiliate links. As an Amazon Associate, I earn from qualifying purchases. Clicking on links, and purchasing products, may result in the seller paying us compensation - at no extra cost to you. Affiliate links are in green.

Also see:
Notes From The Workroom & Trail
10 Easy Sewing Projects
10 Simple Stress Busters
Decor
Mini Quilts - so many uses!
Use these mini blocks for doll quilts, coasters, or Christmas tree ornaments. You can even attach one to the front of cardstock and create a custom greeting card (use non-permanent adhesive such as double sided tape). The mini quilt can be removed by the recipient and used as a coaster.
Just about any quilt block can be turned into a mini quilt block. If you don’t want to do any piecing, you can even use just a one-piece square of fabric.
A quilt block is usually 8" square. A mini block is 4" square. For my two pieced mini quilts, I simply took a couple of my favorite quilt blocks and cut the dimensions by half.
Attach to card stock to create a unique card. Create several to use as coasters. Mix and match mini blocks to make a beautiful doll quilt.
I provide directions for 2 pieced mini quilt blocks
SIZE
The finished mini quilts are 4” square.
SUPPLIES - one 4” mini quilt
Adjust amounts for your project - these amounts were for my project.
PROJECT SUPPLIES
batting or fusible fleece (optional): 4.5” square
decorations: (optional) Other decorations as desired (ribbon, buttons, etc.)
Quilter's Square: For squaring down the quilt block
fabric: Quilt top fabric scraps; also 4.5” square backing fabric
GENERAL SEWING SUPPLIES
sewing scissors
quilting pins
large sewing ruler
fabric marking pencils
seam ripper
rotary cutter and mat (optional but nice)
DIRECTIONS - 3 designs
4” Mini Star Blocks - Ohio Star / Pinwheel / Center Diamond
use 1/4" seam allowance
Iron between each step. Read through all directions completely before beginning.
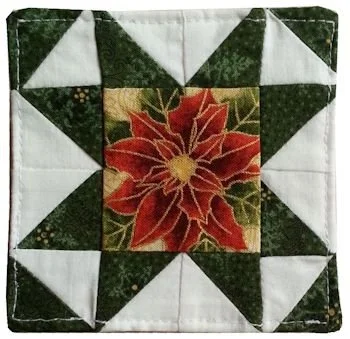
OHIO STAR BLOCK
1. Cut Fabric
I will refer to the fabric colors shown in the photo.
Cut six 2" squares of green
Cut six 2" squares of white
Cut one 2.5" square for the center fo the block (I used a floral print)
Cut one 4.5" square of backing (optional - you need backing only if you are totally finishing the mini quilt. If placing the mini quilt behind the card front, you do not need backing)
Cut one 4.5" piece of batting (optional)
2. Create Pieced Squares
Cut all squares on the diagonal EXCEPT the center square.
Place green and white triangle sets right sides together. Stitch, using a 1/4" seam allowance. Tip: create all sets at the same time. Line them up near the sewing area. Stitch from one set on to the next. Sets will be connected by thread; the thread can be cut when all stitching is finished.
Open each square; press.
NOTE: I enhanced the stitch line in the following photo.

Using a quilter's square, square down each pieced square to 1.5". Go to Free Quilt Lessons: Square Down for directions on squaring down a block

3. Stitch Rows
Arrange row 1 squares as shown. Stitch squares together, right sides together, using a 1/4" seam. Press.

Arrange row 2 as shown. Row 2 is made of 2 small blocks on each end, and one larger (center square) in the middle. Stitch squares together, right sides together, using a 1/4" seam.
Hint: stitch the two outer sets of split squares; then stitch a set to each side of the larger center square. Press.

Arrange row 3 squares as shown. Stitch squares together, right sides together, using a 1/4" seam. Press.

Stitch the three rows together, right sides together, using a 1/4" seam allowance. Press.
Even up edges so that the quilt block is 4.5" square.
4. Finish The Mini Quilt

Pin the backing fabric to the quilt top, right sides together. Stitch all the way around, leaving a few inches open for turning, using a 1/4" seam. Clip the corners.
NOTE: if you are adding light batting or fusible fleece, place that on the back side of the quilt top or backing fabric before stitching around the outer edges.
For more information on layering quilt blocks, go to: Quilt Lessons - Assembling Quilt Layers.
Turn right side out; push corners out; press. Press under the open edges. Topstitch around the block, 1/8" from the edge. The topstitching will close the open area.
PINWHEEL BLOCK
The pinwheel block is made with all the same squares as the Ohio Star Block, but the squares are arranged differently.
By re-arranging the 12 split squares, a pinwheel star can be made.
Follow the directions above for assembling the mini quilt block. Then arrange and stitch the squares as shown below. In the following photo, the squares are placed, but not yet stitched.

CENTER DIAMOND BLOCK
This mini quilt block uses one center square, plus four triangles.
1 . Cut Center Square
Cut one 2.5" square for the center (I used a green print).
2. Create Triangle Pieces
Cut two 3" squares. Cut the 3" squares on the diagonal.
3. Stitch Block Pieces
Stitch each triangle to a side of the center square, using a 1/4" seam. Press. Even up the sides so you have a 4.5" square.
4. Finish Mini Quilt
Finish the mini quilt block as you would the star block above. Layer and assemble as shown for Ohio Star Block above.
NOTE: I cut my triangle blocks are a bit larger, so they overlap beyond the center square. In other words, there is a bit of space around the square. I liked that look.

Create mini block coasters for the holidays, special events, or everyday use. Have fun!
Holiday Sewing


Articles & Tips


Super easy pumpkin pocket placemat. Setting the table can be fun for kids!