Scandinavian Tree Intarsia Crochet
DIY Projects -> sewing -> crochet
Learn Intarsia Crochet
Bring Hygge into your home! Use tapestry and intarsia crochet to create this cozy, minimalist Scandinavian design.
Sized for wash cloth or hot pad: enlarge for pillow, tote, or other item
Disclosure: This site contains affiliate links. As an Amazon Associate, I earn from qualifying purchases. Clicking on links, and purchasing products, may result in the seller paying us compensation - at no extra cost to you. Affiliate links are in green.
Also see:
Lifestyle Blog
10 Easy Sewing Projects
Winter Projects
Embroidery & Crochet
Intarsia Crochet
Intarsia allows color changes without the need to carry yarn. Some people refer to carrying yarn as “tapestry crochet.” I call it “carrying yarn.” With intarsia, the yarn is dropped when not in use (when you switch to a new color). The various colors do not show through one another because they are not carried through. Yarn bobbins are used to hold the various colors of yarn.
With carrying, the yarn runs through the work and shows just a bit. Both methods create nice results.
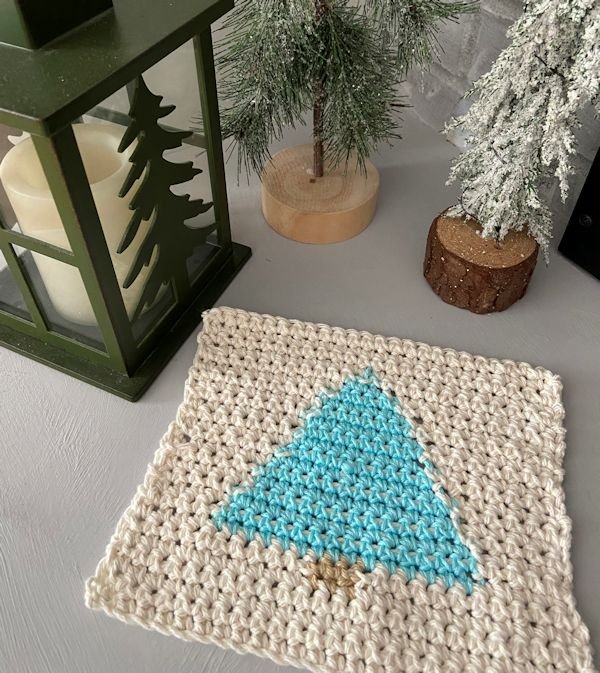
In the following photo, you can see that the white yarn was carried through the tree stitches, so it shows a bit, running through the row of blue. The blue yarn was picked up and dropped only as needed (intarsia), so it does not run through the white stitches.

intarsia vs tapestry crochet
I created this piece as a kitchen holiday wash cloth, but I may add a back and use it as a table trivet. I can’t wait to make a larger version as a pillow!
Intarsia Crochet
Intarsia crochet requires a yarn bobbin to hold yarns for colors brought in by the intarsia method. You can purchase bobbins, or create your own bobbin using cardboard. For my first project, I created a cardboard bobbin. After that I purchased bobbins on Amazon.

Bobbins are used to hold yarn when not in use. You do not “end off” when finished with a color on a row - you switch to the new color and the old is left hanging from the project. The yarn stays connected to the piece until it is needed again - for example in the next row. There is a complete disconnect between the yarn colors you are using, without the need to end off or carry yarn.
Sometimes, a bobbin is no longer needed, and you do end off. The color is picked up again using a new bobbin. That is not necessary for this project. The trunk was one bobbin, and the entire tree was on one bobbin.
Tapestry Crochet
With tapestry crochet, you hold the yarn not in use close to the project and carry it along the top of the piece, incorporating it into stitches as you work along the piece, so that it shows only as a line running through the stitch. You switch to the color of the carried yarn as needed.
Combination Intarsia / Tapestry Crochet
For this piece, I use a combination of tapestry and intarsia crochet. The tree and tree trunk are created using intarsia crochet. The background (white) is carried throughout the piece. That is known as tapestry crochet.
I am not showing how to create these stitches. There are numerous, very good YouTube videos that show it very clearly. This is an example. It is not my video, and we are not affiliated with the creator in any way. I like the video: Intarsia and Tapestry Crochet Tutorial
sc: single crochet
bobbin sc: I use this to designate that you need to switch to a bobbin yarn for your next set of sc
ch: chain
ch 1: chain 1 for turning (this always starts the next row and is your sc that starts that new row)
Free Pattern
Download my free pattern for the tree. It is a pdf file.
Each square represents one single crochet. I have numbered the rows for you. I provide written instructions, as well as a diagram. I am a visual person, so like to refer to a diagram rather than read a lot of words.
The actual pattern looks similar to the following image, but includes written instructions.
NOTE: the white yarn is carried throughout. The trunk and tree were created using intarsia crochet.

Every row is done only in sc.
Ch 1 at the end of every row. That ch 1 will be the first sc of the following row.
Tree Wash Cloth / Trivet Size
My cloth measures 8” wide x 7” high. The size is not crucial - what is more important is that the stitches be the right tension - not too loose or tight.
NOTE: To create a table trivet, crochet a second piece of the same size. That will be the back piece. It can be all sc. Slip stitch the two pieces together for a double thickness.

SUPPLIES
YARN

COTTON YARN
If you are making a dishcloth, table trivet, or other item that will be washed, or will get a lot of use, I recommend using a strong cotton yarn (100 percent is great). You can find it here: cotton dishcloth yarn Yarn Bee, Caron, Lion Brand all make good yarns. Check product descritpion to be sure it is COTTON.
I chose Sugar ‘n Cream by Lily, in ecru (100 percent cotton - washable), and a beautiful blue, cotton yarn by Lionbrand. I purchased them from Amazon, because it was a stormy day and I didn’t want to go out. If possible, I love to shop in stores so I can see and touch the yarns. Both yarns are cotton
I used a small amount of light brown yarn for the tree trunk.
Crochet Hook
I used a size I crochet hook . I crochet a bit tight, so tend to choose a size larger than what the pattern calls for.
Use what works best for you - the important thing is to obtain the correct overall design that is not too tight and not too loose.
DIY Yarn Bobbin
Intarsia crochet requires a yarn bobbin to hold yarns for colors brought in by the intarsia method. You can purchase bobbins, or create your own bobbin using cardboard. For my first project, I created a cardboard bobbin. After that I purchased bobbins on Amazon.
For my DIY bobbin, I cut a slit in the end of a piece of cardboard. Then, I wind my bobbin yarn around the cardboard, and pull the end through the slit. It is held securely while I work. You have to estimate the amount of yarn you need for each bobbin. For the trunk, I just wound it around a few times. I only needed enough yarn for 2 rows of 3 sc stitches.
Start by bringing the yarn end through the slit. Run it down the length of the cardboard, then wind the yarn cross-wise around the cardboard.

OR, if you prefer, you can purchase a set of yarn bobbins to hold yarns for colors brought in by the intarsia method.
Tapestry Needle
I used a bent tip tapestry needle to weave my ends in.
Directions
You will need to start by getting your yarn onto your hook. There are many good YouTube videos on this, and illustrations on other websites. For a quick refresher, refer to my photos below.

Start by creating a loop.

Complete a “pretzel.”

Pull the part of the loose tail inside the circle onto the hook.

Tighten up the yarn ends into a knot, creating a knotted loop on the hook.
EACH ROW IS 25 STITCHES ACROSS, all sc.
After each row, ch1, turn.
THE CH 1 AT THE END OF EACH ROW BECOMES THE FIRST SC OF THE FOLLOWING ROW.
Row 1-4 (main color - ecru): 25 sc
Chain 26. sc into the SECOND chain from the hook (remember the 26th chain on the end counts as the first sc for Row 1). You now have what counts as 2 sc. sc across until you have 25 stitches. COUNT YOUR STITCHES. You should have a total of 25 sc (including your first that was made from the last chain). ch 1, turn.
Continue until you have 4 rows of 25 sc stitches.
Remember to end each row with ch 1, turn.
Row 5: sc 11, bobbin sc 3, sc 11
Row 5 starts your first row of intarsia. The tree trunk is made using the intarsia technique, and the ecru yarn will be carried through the trunk (tapestry method).
sc 11 stitches - remember that your chain 1 counts as your first sc (stitch 1).
STOP after you have HALF of the last sc of the 11. Leave the 2 loops on the hook, and do not end off (do not cut the ecru yarn). That 11th stitch will be completed with the tree trunk color.
Place the trunk bobbin (or skein) close to your work. Set the ecru background color skein of yard off to the side. Place the starting end yarn tail of the tree trunk yarn under your work. Yarn over your trunk color, and pull it through the 2 loops on your hook. This now switches color from ecru to trunk color.
sc 3, using tree trunk color, and carry the ecru color.

To carry yarn: keep the ecru yarn close to the top of your piece. Stitch around the yarn, encasing it into the stitches of the bobbin color so that it doesn’t show outside the stitch.
This way, your finished piece will be finished nicely on both sides (no right and wrong side). You will have several tails of yarn, but those will be woven in when the piece is completed.
In the following photo, the 3 single crochets of the tree trunk are now complete. Remember to change color to ecru to finish off the 3rd tree trunk sc stitch.
ALWAYS finish one color’s last stitch by leaving 2 loops on the hook and using the new color to pull through and finish the stitch.

3 sc tree trunk completed
sc 11 using ecru.
ch 1, turn.
Row 6: repeat row 5 (sc 11, bobbin sc 3, sc 11).
You are now finished with the tree trunk color. End off. Pull the yarn end to the side you will designate as the “back side.” That is the side all yarn ends will be pulled to. They will all be woven in once the item is completed.
Remember to ch1, turn after each row, and remember that the ch 1 is the first sc of the new row.
Row 7-9: starts the tree
Place your blue (tree color) skein near your work. I did not make a bobbin for the blue - I used the skein as the “bobbin.”
You will place it onto the hook the same way you did with the tree trunk color. The ecru is carried all the way through a row of tree color. When finished with the tree for that row, the tree color is dropped and color is changed to ecru.
sc 5, bobbin sc 15, sc 5

Row 10-11
sc 6, bobbin sc 13, sc 6
NOTE: it’s important to keep your yarns untangled. You may have to stop after every row or two to make sure your yarns are straight and easy to use.
The following photo shows the blue “bobbin” that is picked up only when needed, and the ecru yarn that is used in sc or carried. The blue yarn tail is from the start of the blue, there are 2 trunk tails and the starting white tail. I keep all tails on the “back side” while I work. I will not end off with blue until the blue yarn is no longer needed.

Row 12-13
sc 7, bobbin sc 11, sc 7
Row 14-15
sc 8, bobbin sc 9, sc 8

Row 16-17
sc 9, bobbin sc 7, sc 9
Row 18
sc 10, bobbin sc 5, sc 10
Row 19
sc 11, bobbin sc 3, sc 11
Row 20
sc 12, bobbin sc 1, sc 12
End off blue bobbin color.
Row 21-24
sc 25 in ecru (background color)
Complete The Piece
Use a tapestry needle to weave in all yarn ends. I also use the hook to create a slip knot before weaving. It is a personal choice.
Note that the white (ecru) yarn has one starting tail at the beginning and one ending tail at the end of the piece, because it was carried throughout the piece. The trunk has a starting and stopping tail at the trunk; the tree has a starting and stopping tail at the start and stop of the tree.

I love love love this minimalist Scandinavian design. I plan to create more dish cloths, plus a pillow. Maybe some placemats?
It’s easy to adjust size. All you need is graph paper. Each square on the paper could be 1 sc, or a block of 4 sc (2 rows of 2 sc). Play around with your own designs and have fun!

Related Projects
Now that you’ve created the tree - try the slightly more advanced Dala!

Snuggly Scarf
Fully illustrated embroidery stitch glossary.
Learn the art of huck weaving. Lesson and 2 free patterns.
Needlework Projects


Adorable, super easy stuffed cat ornament. Embroider or paint a face. Add a ribbon bow.