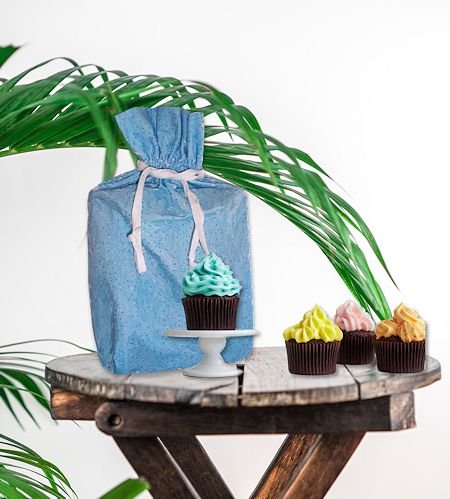
Gift Bag - Brownie Gift Set
DIY Projects -> sewing -> kitchen
Super Easy Drawstring Bag
Plus - our favorite family brownie recipe
Include recipe, mix and pan as a gift!
This pattern comes from our former site, CraftAndFabricLinks. Same owners - new site.
Disclosure: This site contains affiliate links. As an Amazon Associate, I earn from qualifying purchases. Clicking on links, and purchasing products, may result in the seller paying us compensation - at no extra cost to you. Affiliate links are in green.
Great “beginner” sewing project. Practice straight stitching and creating a casing.
Also see:
Blog: tips from the workroom & trails
Easy Sewing Patterns
Remodel Projects
Special Occasions
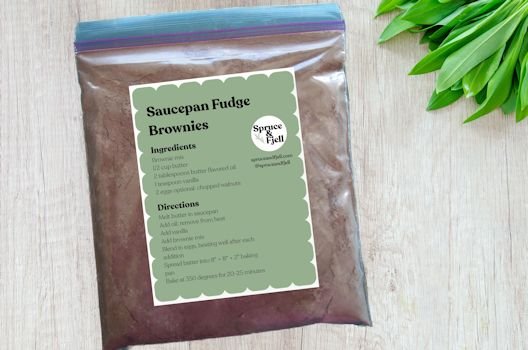
Best Saucepan Fudge Brownies
This tutorial provides a gift bag pattern, plus my recipe for my family's favorite brownies. I perfected this recipe years ago, and people love them. The best part? They can be made right in a sauce pan - no mixing bowls or special equipment needed!
Chocolate Lover’s Gift
This easy-to-make drawstring bag works perfectly as a gift bag. The bag holds an 8” x 8” brownie baking pan plus my sauce pan fudge brownie mix. The perfect gift for all of your chocolate loving friends. Mix the dry ingredients into a zip lock bag, add a decorative label (we supply one for you). Place the mix, directions, and a brownie pan into the drawstring bag and present as a gift. Optional: toss in a spatula that is color coordinated with the gift bag - or matches the recipient’s decor.
The directions list the "secret ingredient" that makes perfect, moist, fudge brownies.
As an alternative, include a mix for cupcakes - with cupcake papers - in place of the brownie mix. You would need to adjust the size of the gift bag to accommodate a cupcake pan.
Gift Bag Size
Approximately 9” x 12” tall, plus the ruffle area above the casing
Cutting Tools
I recommend a rotary cutter, sewing mat, and sewing ruler . I use these tools for most projects because they allow for easy, precise, and fast cutting.
Supplies - makes one bag
One piece of fabric measuring 44" x 12" *
* (1/3 yard of fabric that is at least 44" wide will make one bag, 1 full yard will make three bags)
Two strips of contrast fabric, each measuring 30" x 1.75" (or ribbon for ties)
Sewing Supplies
thread
sewing scissors
quilting pins
large sewing ruler
fabric marking pencils
seam ripper
* optional but nice: rotary cutter and mat (see above “cutting tools”)
Supplies & Directions For Brownie Mix (corrected 10/2023)
note: the gift is the dry brownie mix; the printable label lists remaining ingredients and directions
One quart size zip top freezer bag
6 Tablespoons unsweetened cocoa baking powder (I have traditionally used Hershey's, but now prefer good quality, organic cocoa baking powder)
1 cup sugar
3/4 cup flour
Directions: Mix the sugar, flour, and unsweetened cocoa powder together, and place the mix into the zip lock bag.
label (create your own label, or print our label - see below)
One 8" x 8" x 2" baking pan
Labels For Brownie Mix
We provide a printable pdf label for you. Print to card stock, paper, or a one-sheet label. My zip-lock plastic bag was approximately 7” x 7.5”. Our label is approximately 5” x 6.5”, so fits nicely on the front of the bag. I set it to 200 dpi for a good print quality.
Download Printable Brownie Label
DIRECTIONS - gift bag
PRE-WASH, DRY, & PRESS ALL FABRIC BEFORE USING
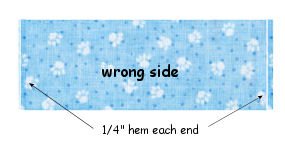
NOTE: All seams 1/4"
1. Turn Under Ends
Turn under 1/4" on each end. Press. Do not stitch.
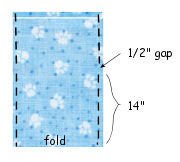
2. Stitch Side Seams
Fold fabric in half so that turned under edges are aligned on one end. Mark 14" from the fold on each side of your bag. Mark 1/2" up from the first mark. Stitch from the fold up to the first mark. Stitch from the second mark to the top of the bag. You should have a 1/2" gap in the stitching. Repeat on the opposite side of the bag. This open area will become the opening for the drawstring when the casing is finished. Press seams open.
3. Create Mitered Corners
To help your bag stand nicely, corners can be created on the bottom of the bag. I provide directions for creating mitered corners in a free tutorial. Go to: Mitered Corners Lesson
4. Create Casings
With the bag still inside out, fold the upper edge down so that the edge of your bag comes just past your side openings (the opening in the seam). In other words, the side openings are now underneath the area that is folded down. The area folded down will be the facing for the top of the bag. My folded area measured 3.5". Press along fold line. Be sure the fold line is straight and the distance from the fold to the lower edge of the facing is equal on both sides.
Stitch along the lower edge of the facing, all the way around, very close to the edge.
Turn the bag right side out. Note where the side openings are. Stitch a second line above the side openings. You should now have a stitched line on each side of the openings created for the drawstring. The two stitched lines created the casing for the drawstring.
NOTE: The diagram on the upper right shows the two stitched lines for the casing with the bag inside out.

5. Create Ties
Cut two pieces of 1/4" or 1/2" ribbon OR create ties. To create ties, cut two 30" x 1.25" strips of fabric. Iron under the two short ends of each strip, 1/4". Iron under the long sides of each strip, 1/4". Fold the strips lengthwise, wrong sides together. Press. Stitch around the three open sides of each strip.
Attach a safety pin to the end of one tie or ribbon. Thread the tie or ribbon through one opening, all the way around through the casing and out the same opening it entered. Remove the safety pin and tie the ends of ribbon or tie together to create the first drawstring.
Repeat with the other tie or ribbon, but thread it through using the opposite opening. Remove the safety pin and tie off the ends of the second tie to create the second drawstring. Pull the drawstrings to close your bag.
NOTE:The fabric I used was new and a bit stiff, so my ties didn't pull easily at first. I pulled them so the bag closed, then opened the bag, then repeated the process a few times. After a few "practice runs" my ties worked beautifully and my drawstring bag opened and closed easily.
ASSEMBLE YOUR GIFT
Place the pre-mixed brownie mix into the zip lock bag. Seal the bag.
Print the label and attach it to the front of the bag.
Place the mix in the brownie pan.
Place the items into your new gift bag. Add anything else you wish - whisk, spatulas, etc.

Printable recipe, with our own tips for creating flavorful soup for a foggy, rainy, blustery, dark day. Bring coziness into your home. We also have a tip for easily cutting butternut squash.
More Totes, Bags & Purses


Home Improvement


Lifestyle Blog


Use double sided pre-quilted fabric to create this roomy tote with pockets. Multi-use bag. Baby supplies, day travel.