Decorative Pillow

An Inside Pocket Holds The Pillow
DIY Projects -> sewing -> pillows
Use this method to create a decorative pillow cover, or a pillowcase.
This pattern comes from our former site, CraftAndFabricLinks. Same owners - new site.
Disclosure: This site contains affiliate links. As an Amazon Associate, I earn from qualifying purchases. Clicking on links, and purchasing products, may result in the seller paying us compensation - at no extra cost to you. Affiliate links are in green.
Articles & Tips
Easy Sewing Patterns
Pillow & Pillowcase Patterns
Craft & Decor Projects
Inside Pocket
I received requests for instructions on creating an inside “pocket” for the pillow to fit into. From the open end, the pillow does not show. The cover is nicely finished. It is actually quite easy, and creates a very nice pillow covering.
I used this method to create a reversible decorative pillow cover. This same method can be used to make a pillowcase that holds your bed pillow in place. The hem area would be wider. For the decorative pillow, the hem that extends beyond the pocket is only 1".
Contrast Fabric
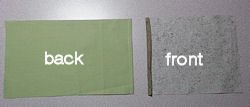
I used contrast fabrics for the front and back sides. This way, I could turn it over and have an entirely different look. Plus, I liked the appearance, because the contrast fabric shows a bit from either side.

Choose Pillow Size
Your finished pillow cover should be a snug fit if it is to be used for a decorative pillow. If using this method to create a pillowcase for a bed pillow, refer to our basic pillowcase pattern for overall dimensions (link above). The dimensions used in these instructions were for a 14" pillow.
INSTRUCTIONS
Cut Fabric
ALL SEAMS ARE 1/4"
The pillow cover front is shorter in length than the back. This is because the back contains the pocket. Both front and back have a 1" flange, or overhang, on the open end. It is hemmed under on the front. On the back, it is hemmed as well, but extends on up inside to create the inside pocket. The "back" to my pillow was teh blue side. My pillow measured 15" square. My fabric for the height of the pillow for both front and back was 14.5". This allows for seam allowances. The side of the pillow contains a hemmed area that extends beyond the pillow (see close-up at right). Therefore, the length of the pillow front equals the pillow width (14") plus 1/4" for the closed end seam allowance plus 2.5" for the overhang hem area.
Pillow Front: Measure your pillow width. Write down that number; I will call it "W". Your fabric width for the front will be cut to W + 2.75". The height of the fabric will be the height of the pillow + 1/2"
Pillow Back: Your fabric width for the back will be cut to W + 5.75". This allows for a 3" pocket inside. The height of the fabric will be the height of the pillow + 1/2" (same as the front).
Prepare Pillow Front & Back Pieces
Front: (white pattern fabric for my pillow) Fold under 1/2" on the end that will be left open. Fold under another 1". Press but do NOT stitch. See photo below.
Back: (blue side for my pillow) Fold under 1/2". Press. Stitch hem, stitching close to hem edge. Refer to first image below.

prepare fabric pieces
Stitch Front & Back Together
For clarity, I stitched up a "mini pillow". Refer to photos below.
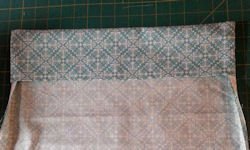
Place front on a flat surface, wrong side up. Place the back piece over the front piece, right side down, lining up the unfinished ends (the ends without folds) and the two sides. The folded end of the back will extend beyond the folded end of the front. Refer to second image below.
Fold the back piece up and over the front piece, so that the sides match in length. Pin along the two sides and end, leaving the end with folded fabric uupinned. Stitch the three pinned sides, using a 1/4" seam. Clip off the corners at the finished end (so you will have a nicer corner when you turn the cover right side out). Refer to third image below.

Flip The Cover Right Side Out
This part is easy to do, but a little difficult to explain. Your back hem now lies on top of the front piece, inside out. Here is the tricky part. Turn the pocket right side out. The back piece’s hem is now inside - on the back piece. See the photo below. You have now created a pocket on the inside of the back piece.
NOTE: The photo shows stitching around the top opening - that comes in the next step.

Add A Flange (overhand)
Now it is time to create the extra little hem area on the open end of the pillow cover. I added this part because if you wanted to create a pillowcase with inside pocket, this part is necessary. Instead of 1", you would have allowed for about 3.5" on both front and back pieces.
Open the pillow and stitch 1" from the edge all the way around. I show the stitching in the above photo, very close to the edge. Yours will be 1” from the edge - to create a 1” flange. This extra line of stitching holds the pillow inside the pocket, and away from the outer edge by 1”. Refer to the above photo under “Contrast Fabric.”
Place Pillow Inside Pocket
Place your pillow into your new cover so that the pillow is inside the pocket. From the side the little 1" hem extends off the pillow, and the pillow is hidden inside the pocket.
Try different fabrics for different effects.

Quilt & Pillow Patterns For You


Adorable, super easy stuffed cat ornament. Embroider or paint a face. Add a ribbon bow.