Pajama Pant Trace Pattern

Disclosure: This site contains affiliate links. As an Amazon Associate, I earn from qualifying purchases. Clicking on links, and purchasing products, may result in the seller paying us compensation - at no extra cost to you. Affiliate links are in green.
Also see:
Lifestyle Blog
Easy Sewing Patterns
Clothing Patterns
Craft and Decor Projects
Start With An Existing Pair Of Pants
For this lesson, you will need an existing pair of pants, and paper to draw a pattern onto.
I always have a roll of butcher paper on hand for pattern making. It is economical and easy to use.
Alter your "master pattern" to create crop pants, flare leg, low waist, ankle length, or shorts. Easily change the size of the pattern. Add borders, a drawstring, embroidery or other details to make them uniquely yours.
Use this same pattern to create nice-flowing comfy casual or dress pants (such as from rayon or rayon-polyester). Go to our free sewing book to learn how to add pockets. One pattern can be turned into a wardrobe of pants and pajama pant patterns!
We will teach you TWO methods for creating your own custom pattern, then teach you how to sew your fabulous new pants.
Lesson 1: Take measurements and draw a pattern based on measurements.
Lesson 2: Take an existing pair of pajama pants and turn them into a custom pattern.
Lesson 3: Sew your fabulous new pants!
Lesson 4: Add an adorable cuff to capri or full length pants.
Step by step, fully illustrated instructions.
SUPPLIES
rotary cutter and cutting mat makes cutting straight lines a snap
large clear sewing ruler I can't say enough about large rulers – use this to draw long, straight lines.
straight quilting pins (optional) quilting pins are larger than regular pins, so are easier to see
spring action fabric scissors regular and micro tip – I use both; the spring action is a huge assistance when doing a lot of cutting
seam ripper - if you are taking apart a pair of pants to use for creating your new pattern, you will need good scissors and a seam ripper.
I always have a roll of butcher paper on hand for pattern making. It is economical and easy to use.
Pant Pattern Basic Information
A pair of pants is generally made with a center seam down the front, a center seam down the back, a side seam on each outer side and an inside seam (inseam) on the inside of each leg. That is how our pants will be constructed, so our pattern will be created in this style. The back waistline comes up a bit higher than the front. This creates a good fit and is why I make my own pj's. Store-bought pj's often cut the back too low and this creates a problem when bending over ("plumber pants"). When you make your own pattern, you can cut the front lower (low slung look) and the back higher for a nice fit. If you want both front and back lower - or higher, that is fine too - it's your choice. Customize the fit to your own taste. That’s the beauty of creating your own pattern.
The Measurements That Make Up Pants
There are 4 main measurements that are important for creating pants. You will be tracing pants; in the end they must fit the following: waist, hip, inseam, crotch length and thigh.
Waist: Your natural waist (circumference)
Hip: Fullest part of the hip.
Inseam: From crotch to the inside of the ankle - or to where you want the pant leg to come to (ankle, mid calf if capri length, on floor etc.)
Crotch Length: Runs from center back waist, between legs, to center front waist
Thigh: Fullest part of thigh (circumference)
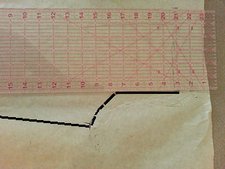
Trace Pant Front To Get Basic Shape
Start by creating a general shape for the front. Lay your pants over paper so that half of the front is lying flat on the paper, as shown in the photo. Note that the waist slopes DOWN slightly from the hip to the center front. The hemline of the pants should be straight across, horizontally.
Tip: I use large sheets of paper that I cut from butcher paper. I also use a large sewing ruler, plus my large cutting mat. These tools make proper measuring much easier, plus they help me keep my lines straight. See “Supplies” above.
Adjust Waistline
The waistline of the finished pants is small, because it has elastic sewn in. We need to adjust for this. The waist must be cut larger, and it will be brought in smaller when elastic is added to the waistband.
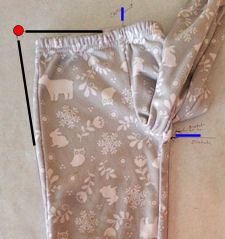
Make a mark on the paper at the center seam of the pants. Keeping the pants center in line with the line drawn on the paper, pull the waist of the finished pants out to the end of its stretch capability. Mark the paper at this point. The front center line must be straight up, vertically, so any addition to width is added to the OUTSIDE of the pant leg (the outer seam). I enhanced the photo with a red dot to show the new outer edge of the waist.
Alter Where The Waistline Rides
If your pattern has a waistline that is higher than you like, it is possible to make the pants hang lower - OR add to the top to make the waistline higher. To lower, just trim an inch or two off the top of the pattern before following these instructions. If you wish the waistline to ride higher, add to the top of the pattern as needed.
NOTE about trimming the top: If you wish to create pants with a lower waistline than the pattern is created for, keep in mine that the back and front might need to be lowered by different amounts. For example, you might take 2" off the front and only 1" off the back (or leave the back as is). When I altered the pattern for this pair of pants, I took more off the front than the back due to the design of the original pattern. I don't want my pants too low in the back, but I like them to ride lower in front.
Adjust Inseam Center & Front
Use a ruler to trace over the center front line. It needs to be straight, vertically. Use the ruler to trace over the inseam. Fill in the center crotch line (curved edge).
Use the ruler to draw the outer seam line, hem and waistline.
Check Your Pattern
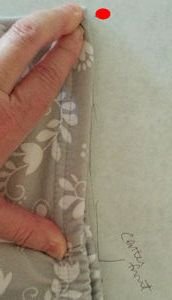
Lay the original pants over your new pattern to check fit. I have enhanced lines and marks in the photo. The blue lines mark the center front at the top, and the center crotch. Make sure your pattern matches your original pants at these points.
Click the following 4 photos for larger view on mobile device.
Add Seam Allowances, Hem & Waistband
Add 1.25" to the top of the pattern (waist); this will be turned down 1.25" for the waistband. This is where the large sewing ruler (listed in “Supplies” above) comes in handy. Note that the waist slopes from the center front to the hip. Add enough to the pant leg to allow for your desired hem plus 1/4". For example, if you want a 1" hem, add 1.25" to the pant leg length. The waistband will be turned down 1/4", and then another 1". Same with the pant leg hem.
Add 1/14" to all other sides to allow for a 1/4" seam allowance (center front, side seam and inseam).
TIP: I cut an angle off the top outer corner (hip) because the upper area will be folded down 1.25". If it is not cut, there will be excess fabric when the waistband is created. Try it - cut the angle off, then fold the upper edge down. It should line up if the angle is cut correctly. It should be the same angle as the main piece, but a mirror image. Do this with hemlines of skirts, pants, or any other item that has an angle at the edge.
At this point, you can alter the pattern to customize the style. Add to pant leg length, create flare leg, capri, etc. Refer to Lesson 1 to learn how to make alterations to your pattern.

add waistband to pants pattern
Repeat To Create Pant Back Pattern Pieces
Trace the front pattern piece. This will be the start of the back pattern.
Adjustments To Create Back Piece
The crotch outer point is drawn further out than the front piece. I used a ruler to draw a new point about 3/4" further out. The photo on the right shows a red dot on the back where the original crotch outer point was. Keeping the inseam the same length, I simply drew the point out further. This was for a toddler size 2 - an adult size would be a larger addition. Lay your pants leg back over your pattern to see how far you should extend this point. Be sure the inseam length on the back pattern piece is equal in length to the inseam on the front pattern piece. The width at the hemline should be equal between front and back as well.
The waistband is cut straight across (horizontally) on the back, rather than sloping down toward the center. From the outer seam line, draw the waistline straight across to the center seam, extending the center seam upward as necessary. The photo above shows a blue dot where the original waist center point was. The outer seam length is not changed.
When finished, lay the back finished pant leg over your pattern to be sure the pattern is correct. Double check key measurements. The following measurements must match (be of equal length) between front and back pieces: pant leg hem width, outer seam, inseam.

Go to our free sewing book - currently still on our CraftAndFabricLinks site - to learn how to add pockets. We will be adding our free sewing book to this site eventually. Go to Sewing Lessons for more free lessons. Your new pattern can be turned into an entire wardrobe of pants and pajama pant patterns!
Sewing Lessons


Set of 4 gift bags from one yard of fabric. Accessory or gift. 3 sizes plus a wine bag. Super easy - beginning sewing project.